Cutterhoochee user guide (English)
Cutterhoochee is a local-first desktop video editor. This guide describes the controls and workflows that are present in the current application. Control names are kept in their exact English form so that you can match the guide to the UI.
Platform note. The Linux x64 AppImage is the exercised desktop package. Windows and macOS are not verified by this guide. A browser-rendered preview can show the interface, but native file access, media normalization, export, and other desktop operations require the native desktop runtime.
Contents
- Overview
- Installation and first launch
- Workspace tour
- Project lifecycle
- Media import and library
- Timeline editing
- Preview and audio
- Inspector, text, and transitions
- Transcription and captions
- Pi assistant, providers, and permissions
- Export
- Keyboard shortcuts
- Practical end-to-end tutorial
- Troubleshooting
- Privacy, storage, and portability
- Limitations and glossary
1. Overview
Cutterhoochee combines a project document, a normalized media library, a frame-based timeline, a native preview/export renderer, local speech evidence, and an optional Pi-powered assistant. The normal working loop is:
- Start a new project through the two-step wizard, or open a saved
.cutprojfolder. - Import video, audio, or still images through a native chooser, or drop external native files anywhere in the desktop window.
- Wait for each asset to finish media preparation.
- Add prepared assets to a video or audio track.
- Edit clips, titles, transitions, audio properties, and captions in the timeline and Inspector.
- Preview, search local transcript evidence if needed, and optionally ask Pi for an edit or inspection.
- Save, then export the selected revision to an MP4, optionally with an SRT caption sidecar.
Cutterhoochee keeps the editable project and derived media separate from the original files. Importing creates managed normalized artifacts; it does not silently modify or delete the original path. The project stores references and identities so that a changed, moved, or replaced source can be detected rather than silently treated as the same media.
What “local-first” means here
- The editor, project document, media normalization, preview renderer, waveform generation, and local Whisper transcription run in the desktop application.
- Local transcription keeps audio on the device. Assistant prompts and project-derived evidence use a separate, broader project-context consent described in Section 10; do not treat it as permission for only one clip.
- Pi is optional. You can perform the editing and use imported SRT captions without connecting an AI provider.
- The one-time speech-model download is a network action that requires its own consent. Downloading the model does not upload your media; transcription remains local.
- Provider credentials are entered by you. Never paste a key into a chat prompt.
Captures used in this guide
The screenshots below are documentation captures made with generated test-pattern footage and test audio, not with personal media. They demonstrate the visible UI and should not be read as claims about a hidden dialog or an unshown workflow.
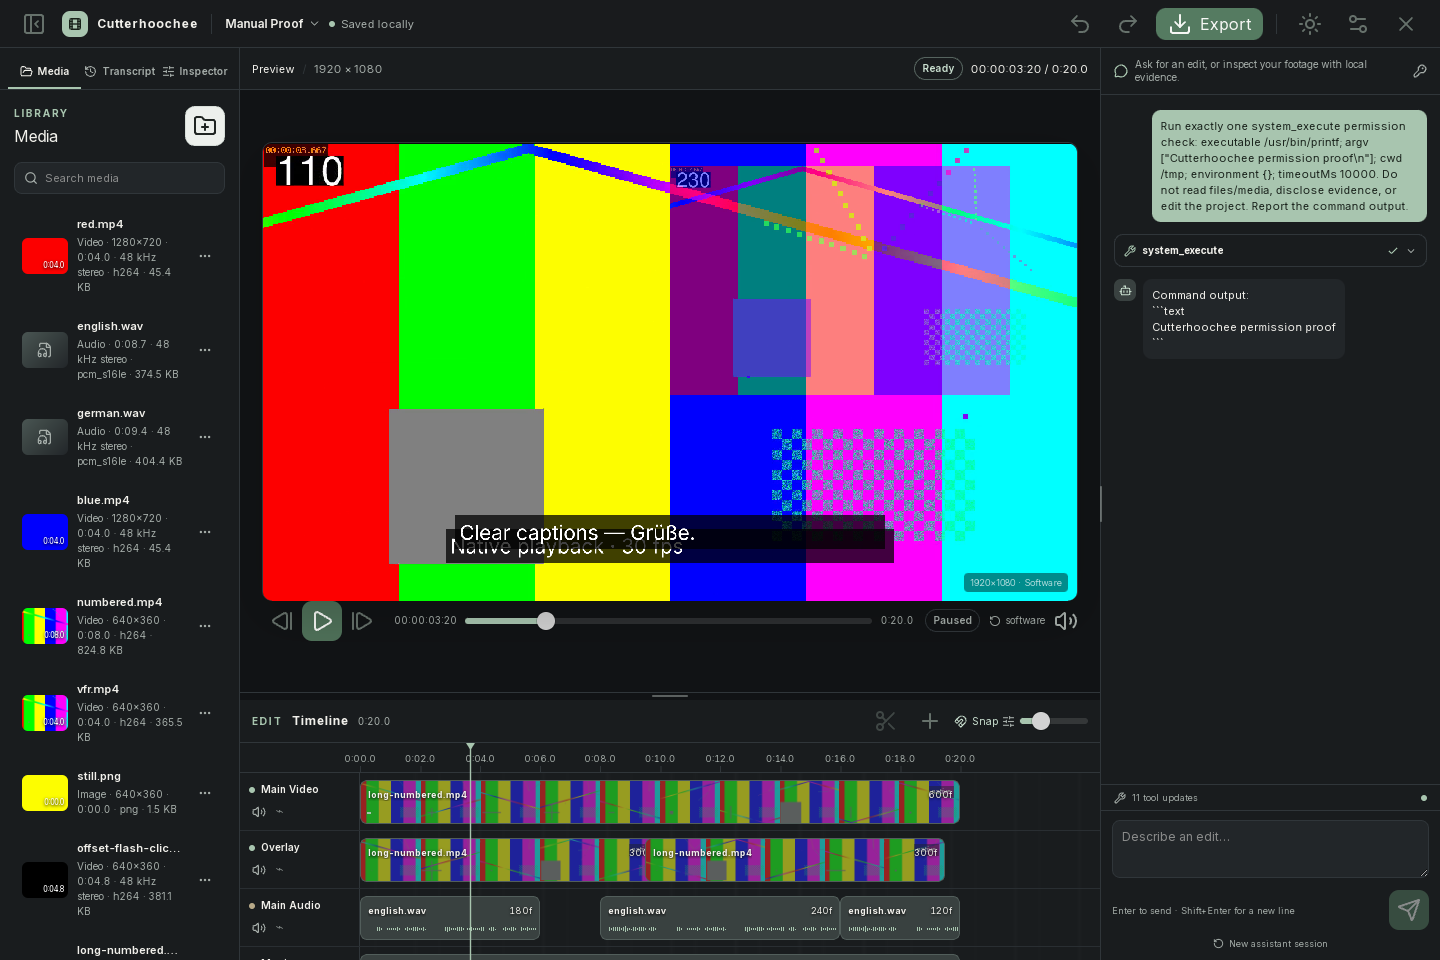
Figure 1 — Dark workspace overview. The visible red.mp4, english.wav, german.wav, blue.mp4, numbered.mp4, vfr.mp4, still.png, and other names are test assets; the Assistant area contains a harmless proof interaction, not personal content.
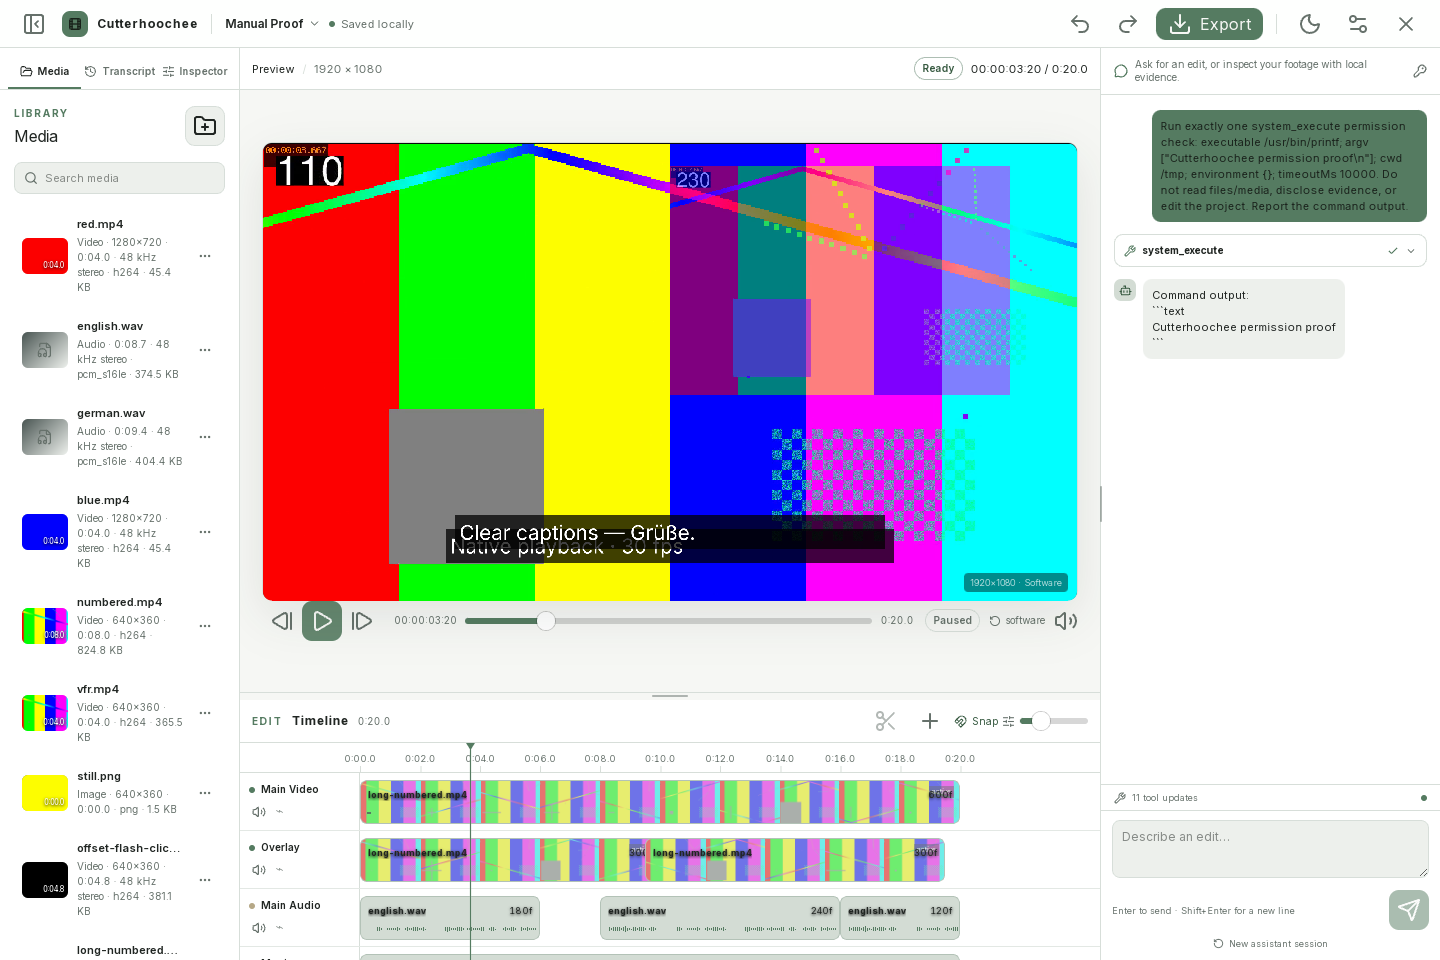
Figure 2 — Light workspace overview. The capture shows the real full workspace after switching theme; the previewed color bars and frame counters are generated demonstration footage.
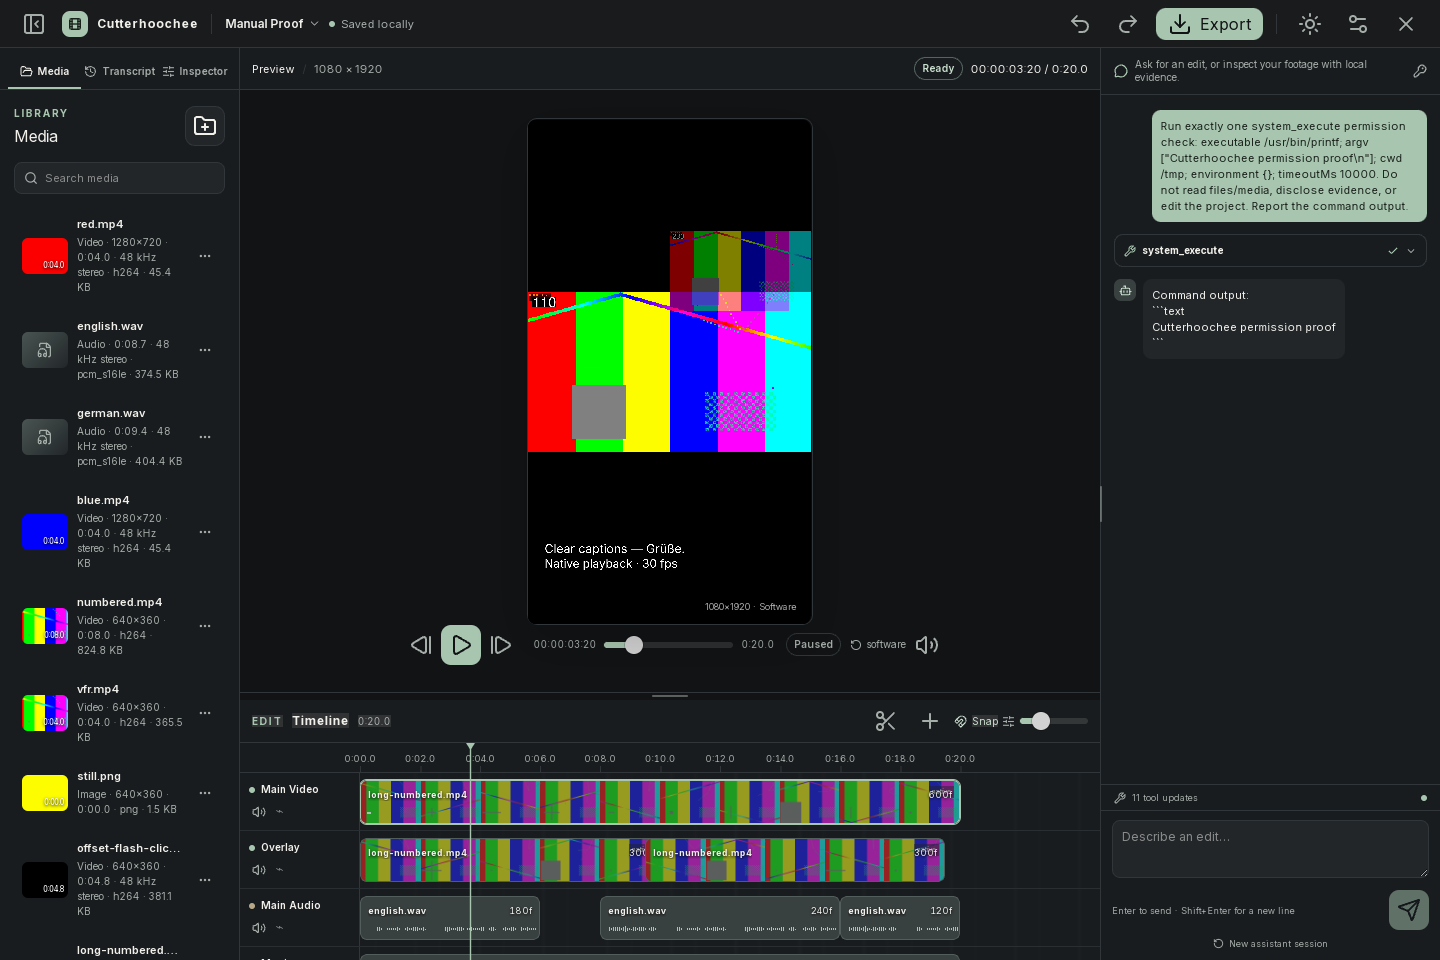
Figure 3 — Portrait workspace capture. It shows a 1080 × 1920 preview, the captions “Clear captions — Grüße.”, and the Software preview label. This is a generated test-pattern project, not a completed-transcript claim.
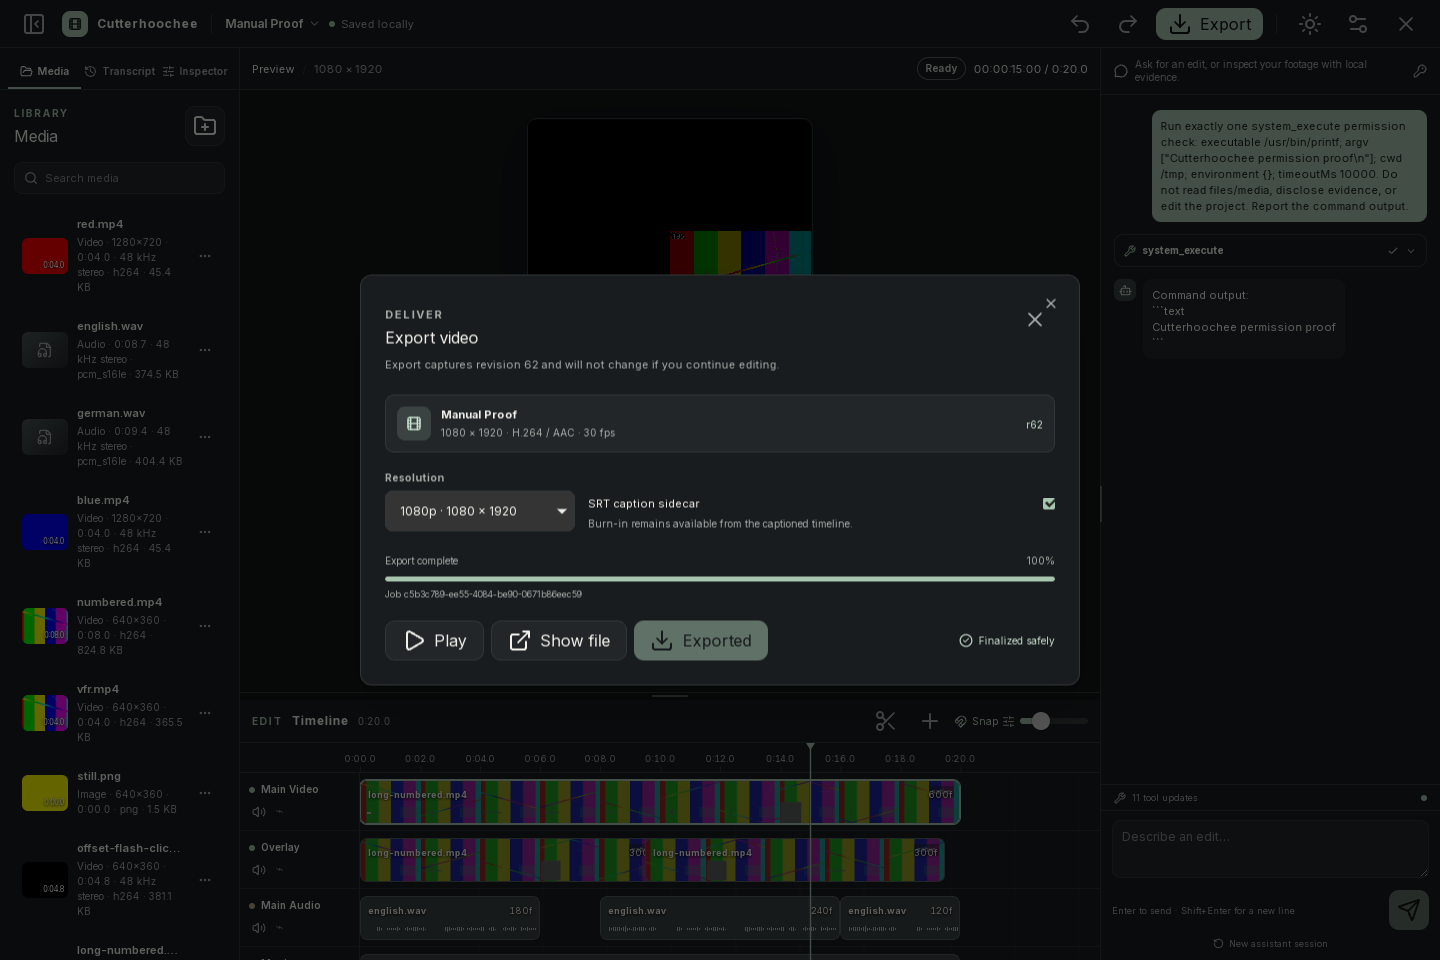
Figure 4 — Completed export capture. The dialog visibly reports a finalized MP4 export, its captured revision, H.264/AAC and frame-rate metadata, 100% progress, and the optional SRT sidecar selection shown in that capture.
2. Installation and first launch
2.1 Install the exercised Linux package
Use the locally built Linux x64 AppImage at the path below, or the specific package supplied to you. This is a local build-output path, not a hosted download link.
Make the file executable using your file manager’s Properties dialog or a terminal command such as:
chmod +x src-tauri/target/release/bundle/appimage/Cutterhoochee_0.1.0_amd64.AppImage
./src-tauri/target/release/bundle/appimage/Cutterhoochee_0.1.0_amd64.AppImage
Launch the AppImage. If your desktop asks whether to execute the file, choose the execute/run option.
Keep the AppImage in a stable location. Moving the AppImage itself does not move a project, but a stable location makes future launches and desktop integration easier.
If your distribution blocks an untrusted download, use the distribution’s normal trust/permission workflow. Do not bypass a warning by running an unknown file as root.
If Linux reports a FUSE/mount problem, this package also supports temporary extraction:
./src-tauri/target/release/bundle/appimage/Cutterhoochee_0.1.0_amd64.AppImage --appimage-extract-and-run
This needs temporary disk space. It does not fix a damaged download or a graphics-driver issue. Do not run the editor as root. The manuals themselves can be opened offline with xdg-open docs/index.html.
This guide does not assert a Windows or macOS installation procedure: those packages have not been exercised for this documentation.
2.2 Check the first-launch connection badge
The start screen shows a badge in the top bar:
- Desktop ready means the native bridge is available for the desktop operations described in this guide.
- Browser preview · desktop required means the UI is running without the native desktop bridge. You may inspect the interface, but native dialogs, imports, project persistence, normalized media, export, and native provider/permission operations are not available there.
If the badge remains Browser preview · desktop required after launching the AppImage, close that window and start the actual AppImage rather than a browser development preview. A missing desktop bridge is not fixed by retrying an import in the browser.
2.3 Choose a project format
On the start screen, click Start a new project. The setup is a two-step wizard:
- On Choose a visual format, select one of the visual format cards:
- Vertical video — 9:16, 1080 × 1920, for Shorts · Reels · TikTok.
- Landscape — 16:9, 1920 × 1080, for YouTube · film.
- Square — 1:1, 1080 × 1080, for Social posts.
- Click Continue to details.
- On Name and review your project, enter Project name. The field starts with
Untitled project, but a non-empty name is required. - Advanced settings is optional. Open it to review Frame rate; 30 fps is selected by default, with 24 fps, 25 fps, and 60 fps also available.
- Review the format, dimensions, and frame rate, click Create project, and choose the parent folder in the native dialog. Cutterhoochee creates
<project-name>.cutprojinside that folder.
Back to format preserves the selected card and returns to the first step. Cancelling the parent-folder chooser leaves the wizard values in place so you can try again. Choose the format and frame rate before importing; a later source file is normalized into this project profile and does not change it.
3. Workspace tour
When a project is open, the editor has three main regions and a top bar.
3.1 Top bar
From left to right, the top bar includes:
- Toggle media pane — collapses or restores the left pane.
- The project title button — opens a project menu with Open project…, Save project (
Ctrl/Cmd+S), the light/dark theme switch, Provider settings, and Close project. - Saved locally or a current status notice — indicates the latest local save status.
- Undo and Redo — project-history actions.
- Import — opens the native media chooser (also
Ctrl/Cmd+I). - Export — opens Export video (also
Ctrl/Cmd+E). - The assistant pane toggle — Hide assistant collapses the right pane; Open assistant restores it.
The save indicator is not a substitute for a backup. For important work, use Save project and copy the project directory only after the save has completed.
3.2 Left pane: Project tools
The left pane has three tabs:
- Media — imported assets, search, inspection, relinking, removal, and Add to timeline.
- Transcript — choose a normalized audio source, Transcribe locally, Import SRT, search local transcript spans, and Apply captions.
- Inspector — properties for the selected clip, title, or caption.
The left pane can be collapsed. If it is hidden, use Toggle media pane to restore it.
3.3 Center: Preview
The center preview displays the project render plan at the selected frame. Its header shows the project dimensions, readiness/transport state, current timecode, and duration. The bottom transport has Previous frame, Play/Pause, Next frame, a Preview playhead slider, a transport state such as paused, and a quality toggle labeled auto or software.
Show GIF demonstration (silent)
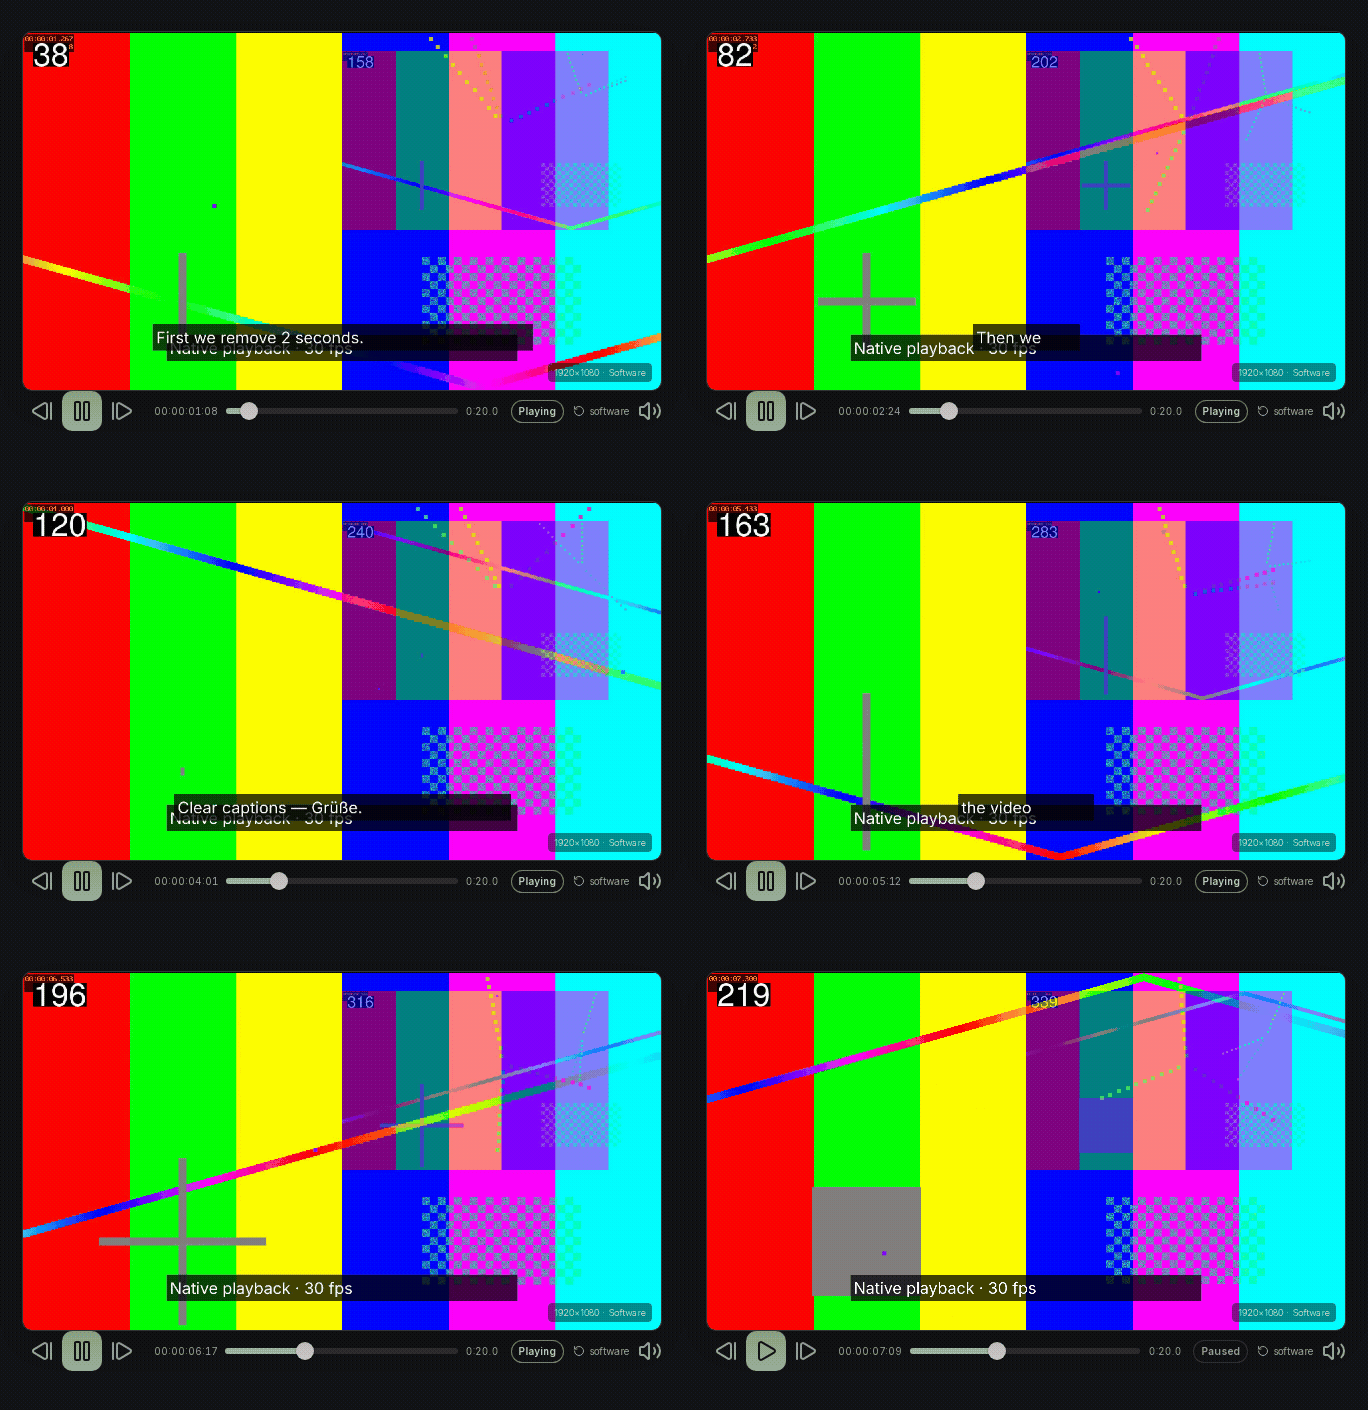
Figure 5 — playback.gif shows generated demonstration footage in the Preview transport. It is not a timeline clip-dragging tutorial and contains no user media.
Show GIF demonstration (silent)
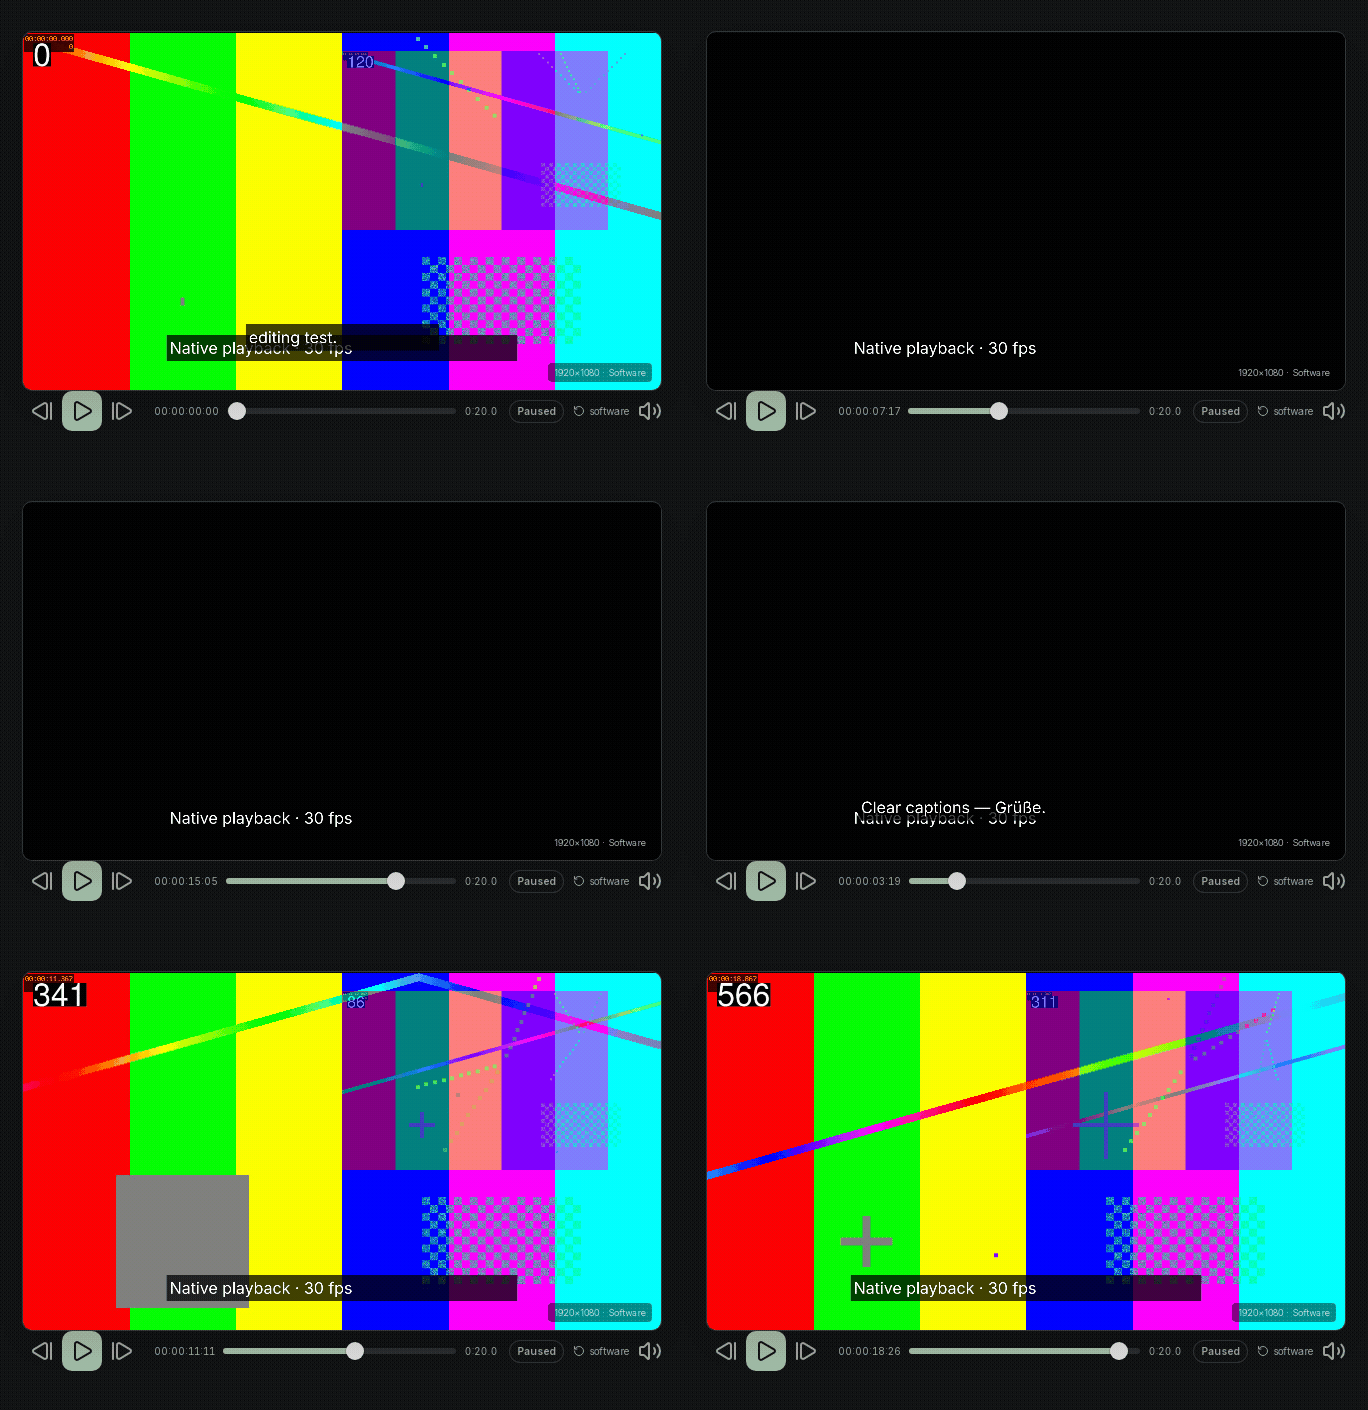
Figure 6 — timeline-seek.gif shows scrubbing the Preview playhead slider. It does not show editing or dragging a clip on the Timeline.
3.4 Bottom: Timeline
The timeline header says Edit, Timeline, and the current duration. It provides:
- Split selected clip (scissors icon).
- Add title (plus icon).
- Snap toggle.
- Timeline zoom slider.
Below the ruler are track rows. A new project starts with Main Video, Main Audio, and Text tracks. Projects may also contain additional tracks (for example, an Overlay video track). Each track has mute and lock controls. The ruler also acts as a range-selection surface: click to put the playhead at a frame, or drag to select a range.
3.5 Right pane: Assistant chat
The right pane is Assistant chat. It can display assistant messages, tool cards, status, usage information, and tool updates. The composer is labeled Describe an edit…. Enter sends a prompt; Shift+Enter inserts a new line. If the assistant is running, Stop requests cancellation. New assistant session clears the conversation and starts a fresh Pi session. Use the top-bar Hide assistant control to collapse the pane; Open assistant restores it without changing the conversation.
Show GIF demonstration (silent)
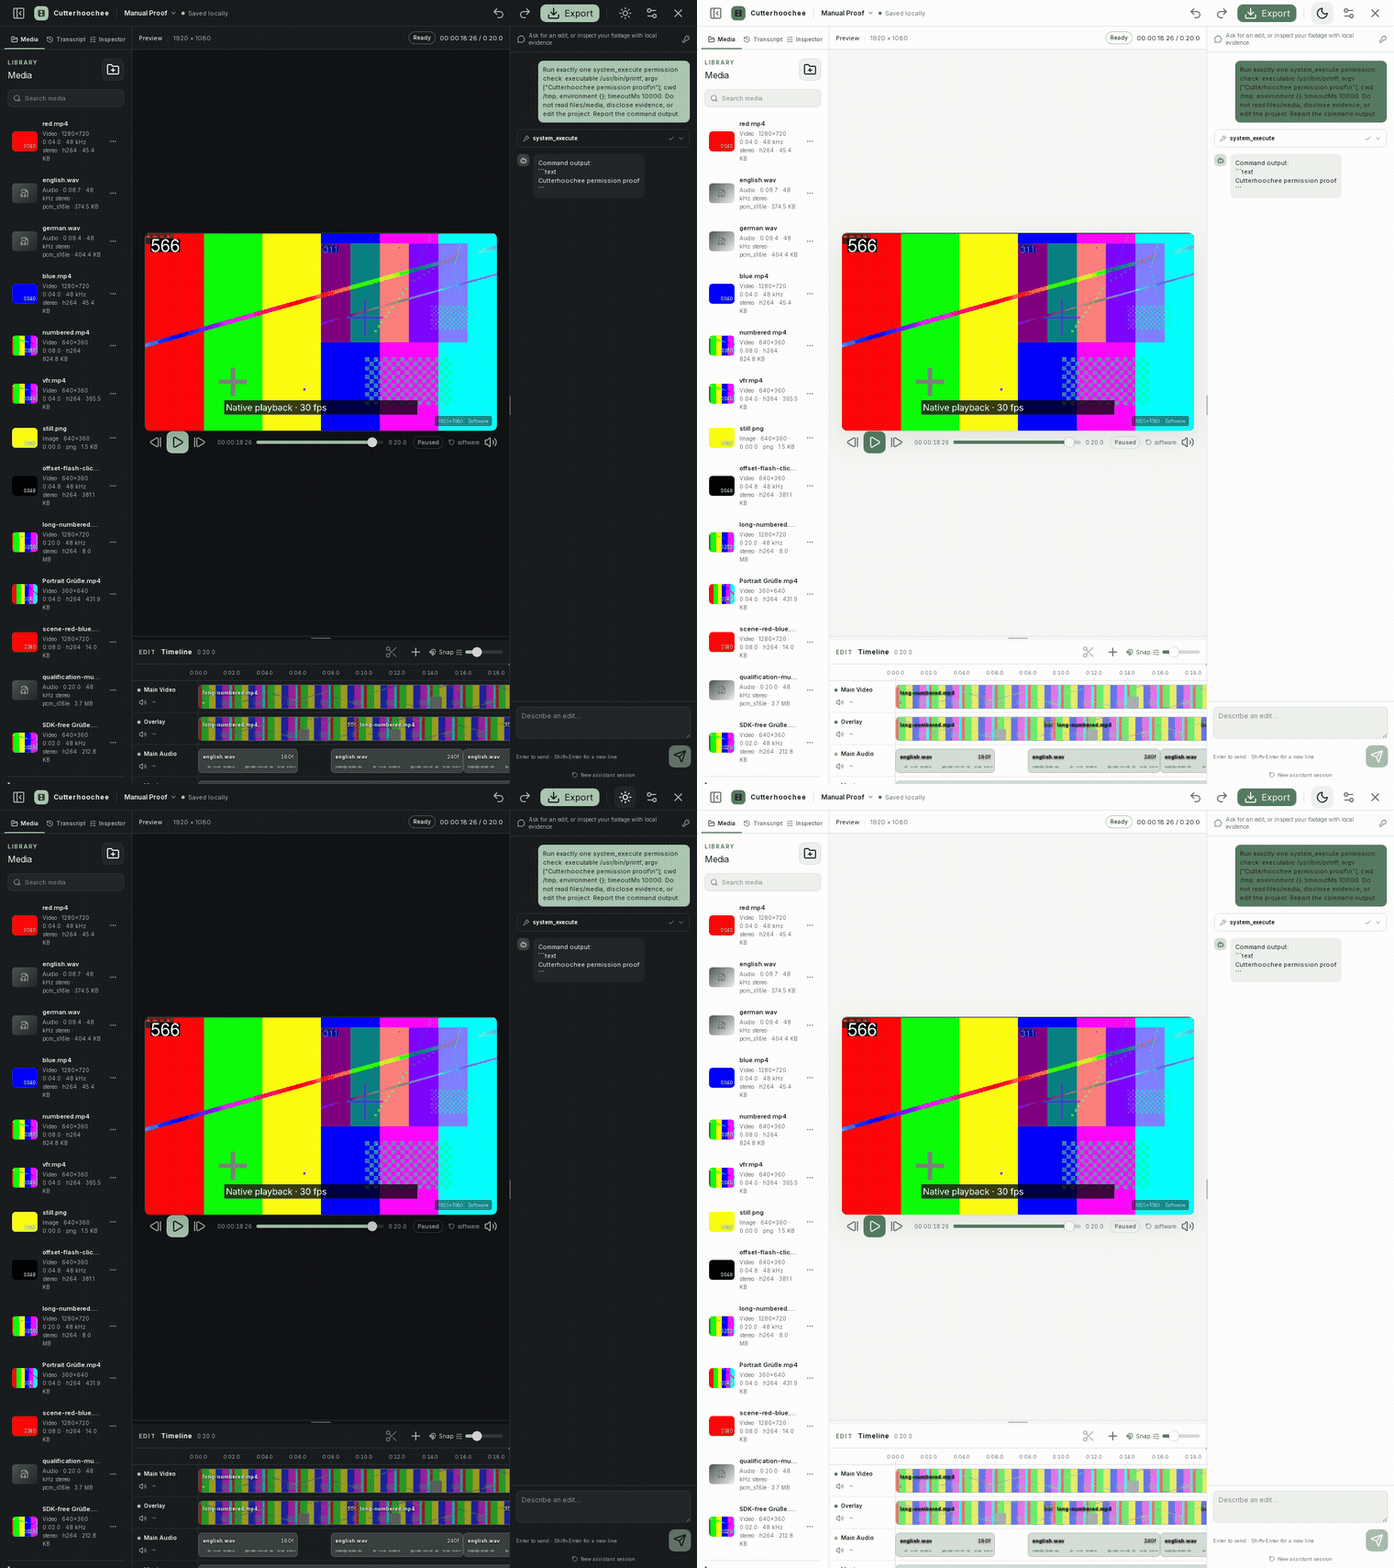
Figure 7 — theme-switch.gif shows the real full workspace alternating dark and light themes. It does not depict a project edit or provider login.
4. Project lifecycle
4.1 Create a project
- On the start screen, click Start a new project.
- Choose Vertical video (9:16, 1080 × 1920), Landscape (16:9, 1920 × 1080), or Square (1:1, 1080 × 1080).
- Click Continue to details.
- Enter Project name on Name and review your project. Open optional Advanced settings only if you want to change Frame rate from its 30 fps default to 24 fps, 25 fps, or 60 fps.
- Review the summary, click Create project, and choose the parent folder in the native dialog. Cutterhoochee creates
<project-name>.cutprojinside it. Remember this full path for reopening and backup. - Wait for the editor to load and confirm the top bar reports local saving.
Use Back to format to revisit the visual card; the card, name, and frame-rate values remain available. If the parent-folder chooser is cancelled, no project is created and the entered values remain in the wizard.
The initial document has revision 0, an empty asset list, and the default video, audio, and text tracks. The project profile is immutable for the operations exposed by the current UI; choose the format carefully before building a timeline.
4.2 Open an existing project
- From the start screen, click Open project, or open the project-title menu in an existing workspace and choose Open project….
- Select the saved
.cutprojdirectory in the native folder chooser, not an arbitrary media file. - Wait for Opening project… to finish.
- Confirm that the expected project name, assets, and timeline appear.
There is no recent-name list to reopen a project. Each Open project action uses the saved .cutproj folder chooser, so keep the parent-folder path for future access and backups.
A project is a directory containing project.json and app-managed media/artifact directories. The native store acquires a project lock; opening the same project concurrently is not a supported collaboration mode. Close the other editor instance before opening the directory again.
4.3 Import from the start screen
On the welcome screen, drop external native video, photo, or audio files anywhere in the desktop window. Cutterhoochee creates a project with the default Landscape profile (16:9, 30 fps), opens the native parent-folder chooser, and then imports the dropped files. If you need a different format or frame rate, create the project first through Start a new project; the welcome drop path does not choose a custom profile.
With a project open, external native file drops work anywhere in the desktop window and add the files to that project. The native runtime owns authorization for the exact dropped paths; approve only the files presented by the native operation when a permission request appears. Browser drops and typed paths do not bypass this authorization.
4.4 Save and close
- Ctrl/Cmd+S synchronizes the already-open project file and directory at their existing location. It is not a Save As command and does not choose a new destination.
- Editing operations are committed to the project document and written atomically. A successful local save does not mean an external backup exists.
- Click Close project only after saving work you want to keep. Closing retires the current native generation; pending work from the old project should not be reused in a new one.
- If a save reports that its outcome is unknown, follow the message and reopen the project before continuing. Do not overwrite the directory manually while the editor is still open.
4.5 Undo and redo
Every normal editor operation is committed with a label and participates in project history. Use Undo / Redo or the keyboard shortcuts. History is revision-aware. If another native call has changed the project, Cutterhoochee refreshes the latest timeline and discards the stale gesture instead of applying it to a different revision.
5. Media import and library
5.1 Supported import families
The native probe accepts standalone local media from these demuxer families:
- Video/container families: MOV/MP4/M4V-style files, Matroska, WebM, AVI, MPEG-TS, MPEG, FLV, OGG/OGV, and related FFmpeg-supported standalone containers.
- Audio families: MP3, WAV, FLAC, AAC, OGG/Opus, and related standalone audio streams.
- Still-image families: PNG, JPEG, and WebP image sequences/files exposed as a still image.
The visible import controls accept local files, while the native allowlist remains the authority: a filename extension alone does not guarantee import. Playlists and network media are explicitly rejected: HLS, DASH, concat/segment/playlist inputs, HTTP, RTSP, and similar network sources cannot be imported as a standalone asset.
Do not import a directory, playlist, URL, or a file whose contents do not match its media metadata. Import is a native, permission-gated operation on an absolute local path.
5.2 Import through Media or native file drops
- With a project open, click the top-bar Import button or open the Media tab and click Import media.
- In the native chooser, select one or more local files.
- Confirm the file permission request if shown.
- Wait while each item changes from Preparing normalized media… to a ready asset.
You can also release external native files anywhere in the desktop window. The native runtime authorizes the exact dropped paths; accept only the presented file grant if one appears. A browser file drop or a manually typed path is not an alternate import route.
You can also drag an asset card from the library onto a timeline track. Dragging creates a copy/reference clip in the timeline; it does not move or delete the managed asset.
5.3 Understand asset cards
A ready asset card can show:
- The original filename.
- Video, Audio, or Image type.
- Dimensions, duration, normalized audio format, source codec, and original byte size when known.
- A generated thumbnail for video/still content.
- A waveform when normalized audio is available.
- An Add to timeline button.
- Inspect and the actions menu.
During preparation, the card may say Preparing normalized media… or Media preparation is incomplete. A thumbnail may separately say Generating thumbnail… or Thumbnail unavailable. These statuses are not interchangeable: an asset can be normalized while its optional display thumbnail is still being generated.
The normalizer creates a master video and a same-frame-count proxy for video, and converts audio to application-owned 48 kHz stereo PCM. A still image becomes a one-frame normalized video source. Video input is converted to the selected project frame rate, so edit decisions are made against project frames rather than an original variable-frame-rate clock.
5.4 Add media to the timeline
- Select a ready library card and click Add to timeline. For video or still-image assets, this appends a clip to the end of the first video track. For audio assets, it inserts the clip at frame 0 and caps its duration to the existing timeline duration when one exists; it does not use the current playhead.
- Or drag the card onto a specific compatible track and frame position when you need explicit placement.
- Video assets belong on video tracks; audio assets belong on audio tracks. The UI rejects or warns when no compatible track exists.
- If the asset is not ready, wait for normalization. Relink is offered only when the normalized asset/managed artifact is unavailable or incomplete; it is not a general “refresh” button.
5.5 Inspect, relink, and remove
- Inspect runs the native media inspection action and refreshes the library. It does not open a detailed identity/properties viewer in the current UI.
- Relink is available when the project needs the original again to recover missing/incomplete normalized media. Select the intended replacement path in the native chooser and verify the resulting asset yourself; do not assume relink compares the replacement with the old content hash or that it is a safe way to swap media silently.
- Remove removes the asset from the project library. The asset’s clips must be removed first; the native operation refuses to remove media still referenced by clips. Removing an imported asset does not delete the original file from its source location.
Caution: Removing a clip and removing its library asset are different operations. If you only want to take a shot out of the edit, select the clip and use Remove clip or Delete; do not remove the library asset unless you intend to remove the project’s reference and derived media.
5.6 Missing media recovery
An original path can move or disappear after import without making a complete managed project unusable. If the .cutproj copy still contains the normalized masters/PCM and other referenced artifacts, the project remains editable, playable, and exportable; the original path is metadata, not a requirement for every later operation. The library shows Relink only when a normalized asset or managed artifact is missing/incomplete and native preparation needs a source again. In that case, choose the intended replacement file, wait for normalization, and review the refreshed asset and timeline. Do not edit project.json by hand to change a path.
6. Timeline editing
6.1 Work in frames, not guessed milliseconds
The timeline ruler and Inspector timing values are integer project frames. Timecode is displayed using the project’s selected frame rate. At 30 fps, for example, 30 frames represent one second; at 24 fps, 24 frames represent one second. The accepted project rates are 24, 25, 30, and 60 fps.
Imported VFR media is normalized into the project frame grid. The normalized master and proxy have the same frame count, and all later clip timing, captions, transitions, preview, and export use those project frames. This prevents a later preview/export pass from silently switching back to original VFR timestamps.
6.2 Select a clip, text item, or range
- Click a clip to select it and move the playhead to its start.
- Shift-click clips or text items to add/remove them from the selection.
- Click the ruler to move the playhead.
- Drag across the ruler to create a selected range. The range has
startFrameandendFrame; the end is exclusive. - Clicking a blank timeline area moves the playhead without selecting a clip.
Selection is persisted as timeline state, but it is not a content edit. Moving the playhead does not create an undo entry.
6.3 Move a clip
- Press and hold the primary mouse button on the clip body.
- Drag horizontally within its existing track.
- Release at the desired position.
- With Snap enabled, the release position snaps to frame
0, the playhead, and nearby clip starts/ends within the snap threshold. - With Snap disabled, the clip remains at the nearest whole frame represented by the pointer.
Moving a clip removes an explicit dissolve involving that clip before committing the move, because the transition graph must continue to describe an exact overlap. If captions belong to a moved clip, the native editor moves their projected timing with that clip and respects the lock state of the caption track.
There is no drag-to-another-track operation in the current clip pointer handler; use the supported track/operation controls rather than assuming a cross-track drag will change a clip’s track.
6.4 Split a clip
- Select the clip.
- Put the playhead strictly inside its interval (not on its first or last frame).
- Click the scissors button (Split selected clip), use the clip context menu’s Split at playhead, or press
Swith no modifier. - Confirm the two resulting pieces in the timeline and Inspector.
A split preserves the source-frame partition. Captions owned by the clip are partitioned in source space, and fades are bounded to the new pieces. You cannot split a locked-track clip. You also cannot split inside or at the boundary of an explicit dissolve; remove the dissolve first, split, and add a new dissolve only if the resulting clips meet the transition rules.
If Cutterhoochee says Place the playhead inside the selected clip to split it, move the playhead before trying again. If it says to remove a dissolve first, do exactly that instead of repeatedly retrying.
6.5 Remove clips and remove a range
- Select one or more clips and press
Delete, or right-click a clip and choose Remove clip. - To remove a time span, drag a range on the ruler, hold
Shift, and pressDelete. The current UI commits Remove range with ripple enabled. - Removing a range can split or shorten clips, shift later clips and standalone text, and project source-owned captions to the retained segments.
Range removal is destructive to the edit’s timing even though it is undoable. Before using it, check the range start/end frames and save a revision you can return to. Locked tracks can block a range edit when a clip, text item, or owned caption on that track would need to change.
6.6 Mute and lock tracks
Each track row has two icon buttons:
- Mute/Unmute toggles whether that track contributes audio in preview and export. On a video track, muting silences the track's audio while its video remains visible.
- Lock/Unlock prevents timing/content edits that would touch the track.
Use Lock before inspecting a multi-track section to avoid moving it accidentally. A locked track is an editing constraint, not a permanent protection boundary: unlock it only when you intentionally need to edit it.
6.7 Zoom and navigation
Use the Timeline zoom range control to change the number of pixels per frame. The control is bounded; zooming does not change timing. Scroll the timeline horizontally to reach later frames and vertically when the project has many tracks. The zoom implementation keeps the playhead near its current viewport position when possible.
7. Preview and audio
7.1 Preview transport
The preview is generated from the current native render plan. Use:
- Previous frame and Next frame for exact one-frame movement.
- Play/Pause for transport.
- The Preview playhead slider for direct seeking.
- The timecode readout to identify the current project frame.
A playhead change while paused is saved as timeline selection state. Seeking while playing stops the old scheduled buffers and resumes from the new anchor when enough data is available.
Show GIF demonstration (silent)
Figure 8 — The GIF repeats a Preview play/pause/frame transport action; it does not demonstrate timeline clip editing.
7.2 Preview quality and software fallback
The preview quality button toggles between auto and software. Auto uses the normal native/browser decoder path where available. Software requests the bounded software preview path, which is useful when hardware/browser video decoding cannot display a source. Software preview is a lower-resolution preview path (the renderer bounds its preview canvas rather than promising export resolution); it is not an export-quality setting.
The corner label reports the project dimensions and either Auto or Software. A buffering overlay means the engine is obtaining the required frame/audio window. An error overlay offers Retry preview. If video decoding remains unavailable, use Software, retry after normalization, and inspect the notice for a source-specific error. Do not infer that a successful software preview means the source is accepted by every external player.
7.3 Audio clock and waveform
Application audio is normalized to 48 kHz, stereo PCM and scheduled on the native project sample grid. Browser/device output may use a different hardware rate, but project sample coordinates remain 48 kHz. The timeline waveform is a bounded peak summary of normalized PCM; it is a visual aid, not an audio export substitute.
The preview’s volume icon is an indicator, not a user volume slider. Change clip level using Gain · dB in Inspector. Clearing Clip audio excludes audio from the selected video- or audio-track clip. Mute excludes audio from the muted track in preview and export; muting a video track leaves its video visible. Use these controls to shape the mix, then inspect the final export.
7.4 Audio gaps and mixed tracks
The render plan includes audio segments and intentional silence where no enabled clip contributes. Video-only assets can therefore play without an audio stream, while export still produces an audio stream for the final MP4. If audio is missing, check:
- The clip has normalized audio (an audio waveform can be generated).
- For the video- or audio-track clip, Clip audio is enabled when its sound is wanted.
- The containing track is not muted. Muting a video track removes only its audio; its video remains visible.
- Gain · dB is not set below the audible range.
- The playhead is inside the clip’s timeline interval.
8. Inspector, text, and transitions
8.1 Open the Inspector
Select a media clip or text item, then choose the Inspector tab. With nothing selected, the panel says Nothing selected and instructs you to select a clip, title, or caption.
Inspector groups follow the selected track type: Canvas and Transitions apply to video-track clips, while Audio applies to both video-track and audio-track clips.
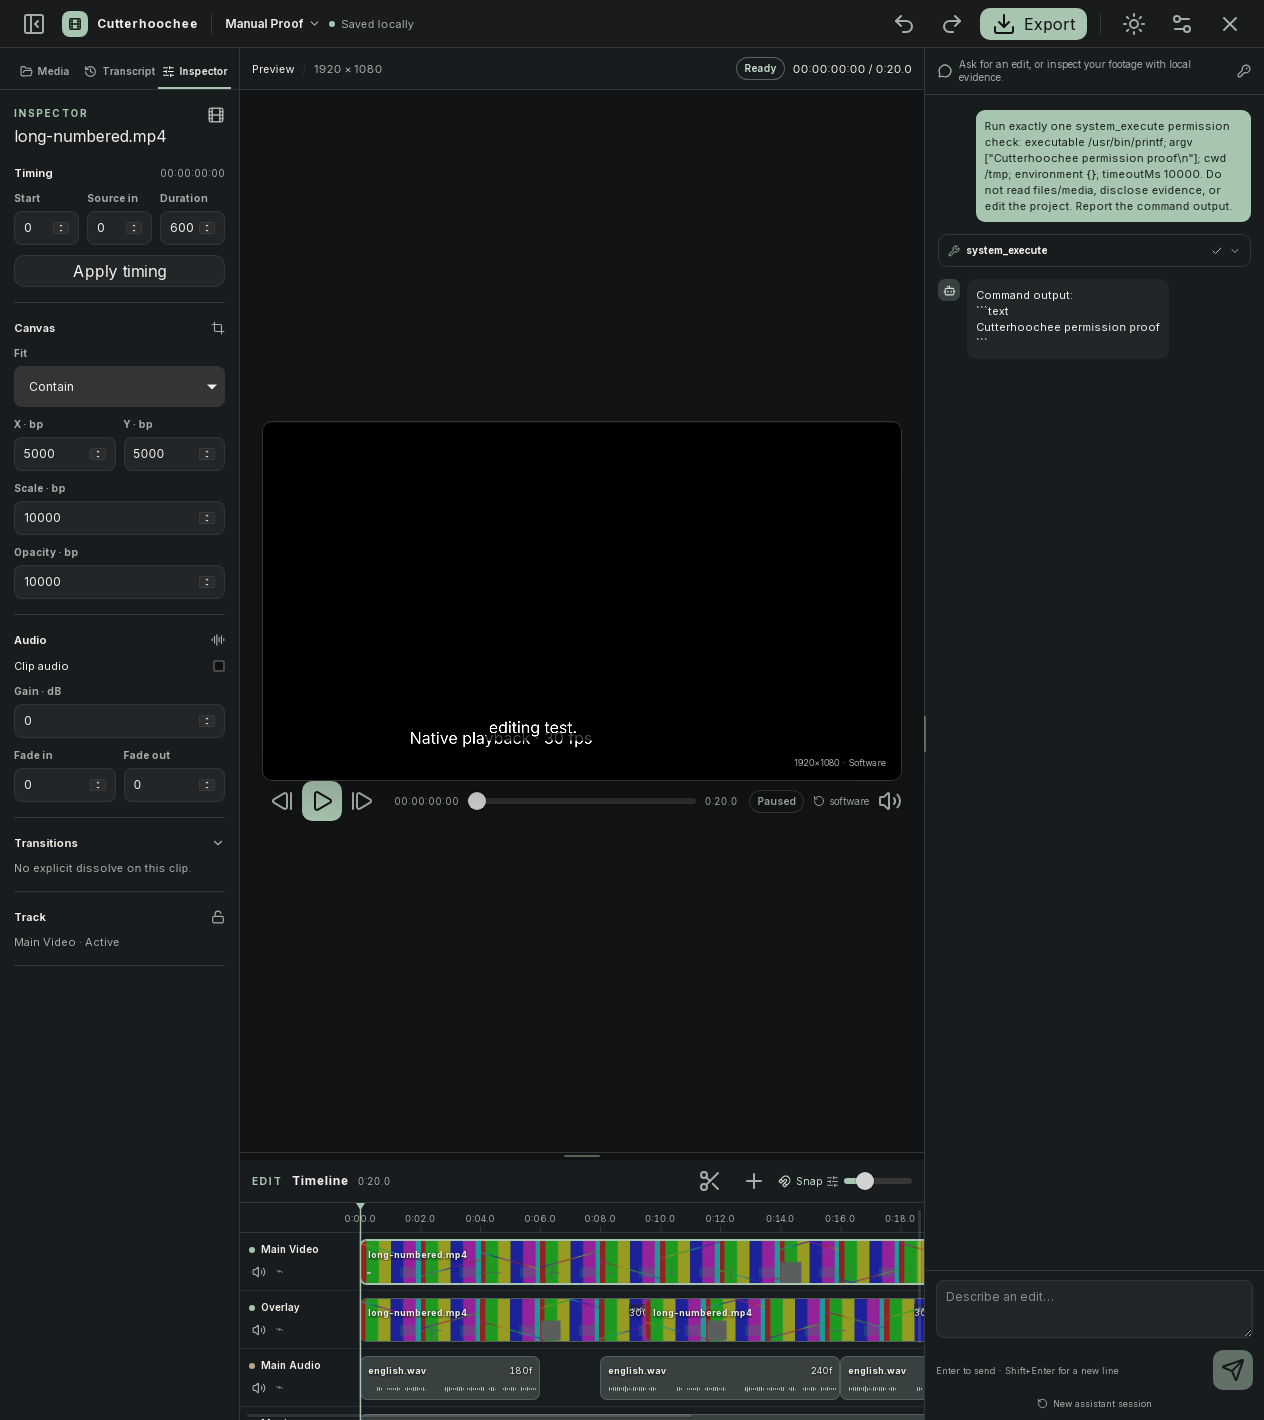
Figure 9 — Inspector capture for the selected generated long-numbered.mp4 clip. Only the fields visible in the capture are described here; the test-pattern media is not user footage.
8.2 Clip timing
For a selected media clip, Timing contains:
- Start — project start frame.
- Source in — source frame used as the first frame.
- Duration — retained duration in project frames.
- Apply timing — validates and commits the three values.
Values must be non-negative whole frames, and Duration must be positive. The native operation validates the source range, project range, track, and any transition relationship. If a timing change would invalidate an explicit dissolve, the UI removes the existing dissolve in the same edit before applying the trim; review the result rather than assuming the dissolve remains.
Destructive-edit caution: Applying timing can remove source content or change which source frames captions refer to. Use Undo immediately if the resulting preview is not what you intended.
8.3 Canvas and visual properties
For a selected video-track clip, the Canvas section provides:
- Fit — Contain or Cover.
- X · bp and Y · bp — base-point positions from
0to10000;5000is the centered coordinate. - Scale · bp — scale in base points from
100to40000;10000represents 100%. - Opacity · bp — opacity from
0to10000.
The values are normalized project coordinates rather than CSS pixels. Use small deliberate changes and confirm the canvas after each blur/commit. A field can commit on blur, while Apply timing commits the timing group explicitly.
8.4 Clip audio properties
For a selected video-track or audio-track clip, the Audio section provides:
- Clip audio checkbox. It excludes audio from both video-track and audio-track clips.
- Gain · dB, bounded by the current native validation range (the control exposes a practical range of
-60to12dB and accepts decimal steps). - Fade in and Fade out in whole frames.
Fades are frame-based and are clamped when a clip is split or shortened. If an audio change appears not to apply, leave the field to trigger its blur commit, then refresh the preview.
8.5 Titles
Click Add title in the timeline toolbar to create a title on the text track at the current playhead. The default title is Your title, uses the Clean style, and lasts approximately three project seconds (rounded to whole frames). A text track is required; if none exists, the UI reports Add a text track before creating a title.
Select the title block on the text track and edit it in Inspector. The text inspector provides:
- Text textarea (committed when it loses focus).
- Style selector, including Clean and Boxed.
- Size and position values (base-point coordinates).
- Remove title for a title, or Remove caption for a caption.
Titles are editable text items in the project document. They are rasterized with the app’s bundled font during preview/export; do not expect a font installed only on your machine to change the rendered title.
8.6 Captions and text items
Caption items are also editable text items, shown on the text track with a CC marker. Select a caption to edit its text/style and placement in Inspector. Caption timing may be owned by a source clip; moving, splitting, trimming, or removing that clip projects the owned caption range with the retained source interval. Keep the text track unlocked for operations that need to move or split those captions. Editing a caption changes the editable project item, not the transcript evidence; it does not rewrite the stored transcript. The current UI has no direct drag/timing control for text or captions.
8.7 Dissolves
The Transitions section is available for video-track clips. A dissolve is an explicit transition between two adjacent clips on the same video track. To add one:
- Select the left clip.
- Confirm that a next clip exists on the same video track and will follow it.
- In Inspector, open Transitions.
- Enter Frames. The duration must be at least 2 frames and shorter than both clips.
- Click Dissolve next.
The two clips overlap by exactly the transition duration after the operation. The transition row shows Dissolve · Nf. Use Remove dissolve in the row or clip context menu to remove it.
Dissolves are not supported on audio/text tracks. You cannot split inside the dissolve overlap, and moving/trimming a transition clip removes the dissolve first. If you need a different cut, remove the dissolve, make the edit, and add a new transition at the valid boundary.
9. Transcription and captions
9.1 Choose a normalized source
Open the Transcript tab. The Audio/video source selector lists video and audio assets that have normalized audio. If the list is empty, the panel says No normalized audio source. Import a source with an audio stream and wait for preparation before trying again.
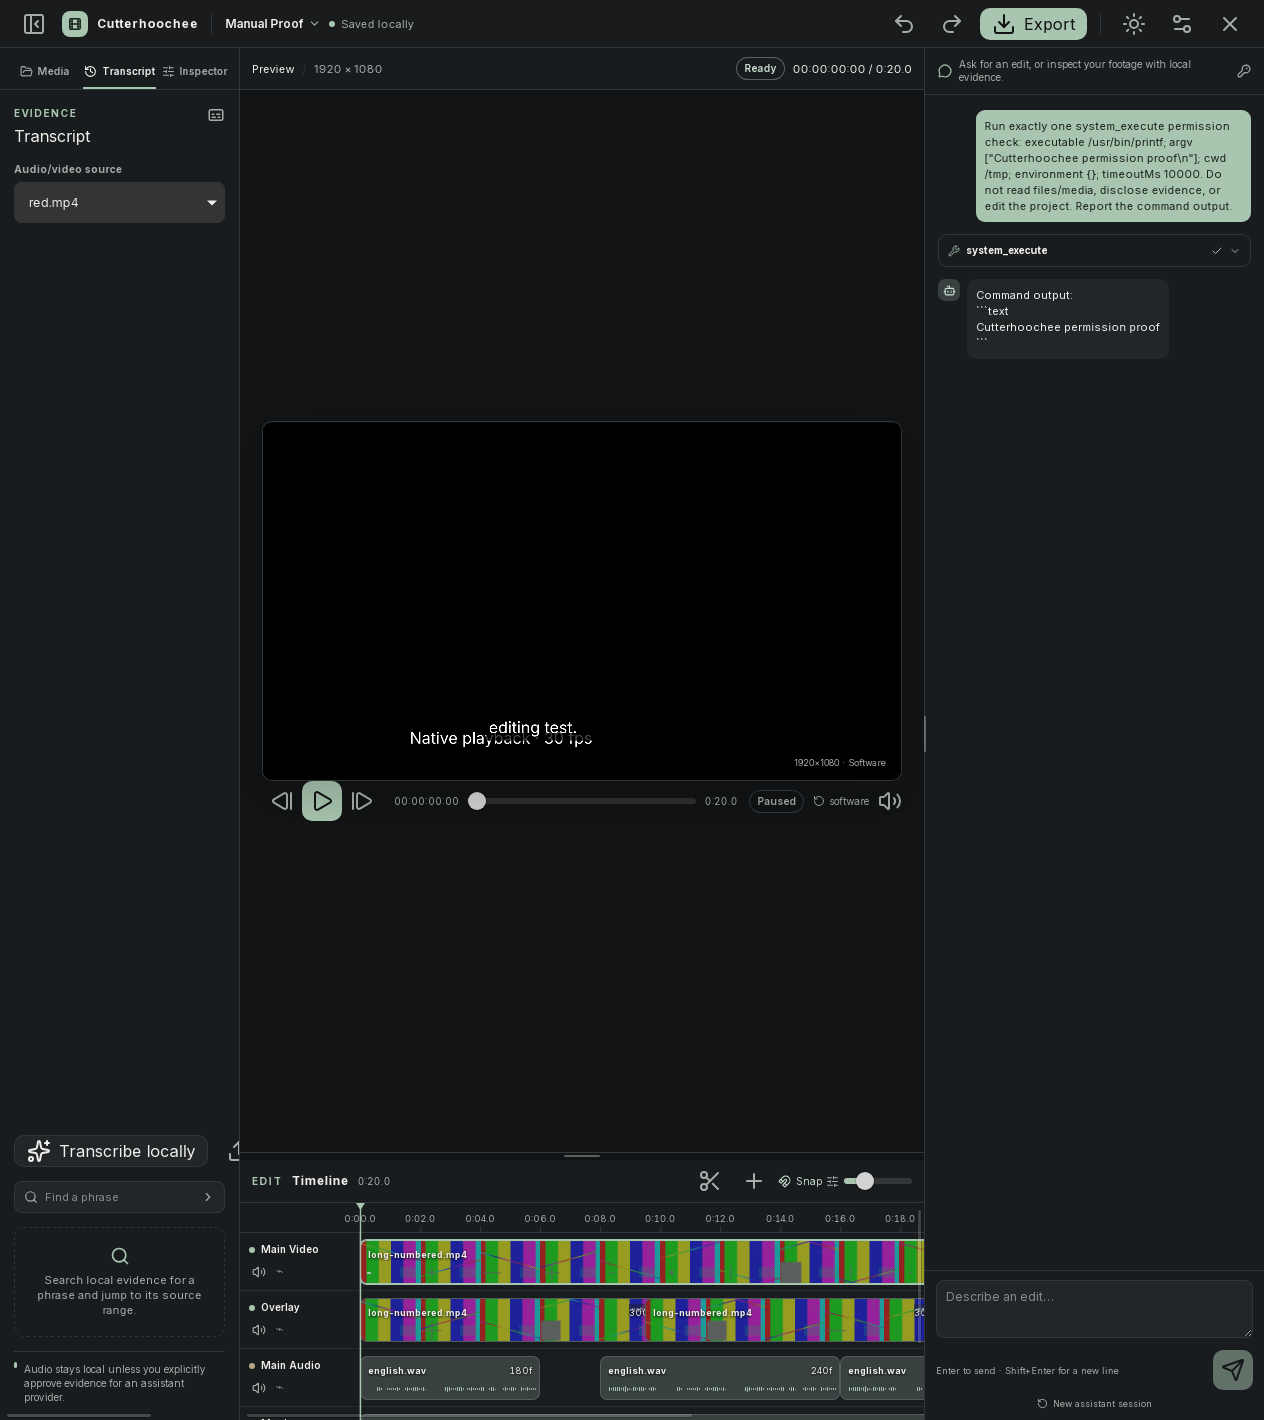
Figure 10 — Initial Transcript capture. It shows the source selector, Transcribe locally, Import SRT, and search controls; it is not a completed transcript and does not show transcript results.
9.2 First-use local model consent
Click Transcribe locally. Before a first transcription, Cutterhoochee may show Download local speech model?. Review the displayed:
- File
- Download size
- Source
- Revision
- SHA-256
- Network/use statement
The current native-pinned model is a multilingual Whisper model (ggml-small.bin, approximately 465 MiB/487,601,967 bytes as reported by native metadata). The one-time model download goes to app-owned storage. Click Download and transcribe only if you consent to that network download; click Not now to decline. Declining leaves manual editing and SRT import available.
The model consent is action-specific and is not persisted in the project document. A model already present and verified in app storage can be reused without downloading it again. If model verification fails, remove no files blindly; re-open the panel, review the native status, and use the displayed source/revision/hash to diagnose the local model.
9.3 Generate and review a transcript
- Select the source in Audio/video source.
- Click Transcribe locally.
- If prompted, review Download local speech model? and choose Download and transcribe or Not now.
- Wait for Transcribing… to finish.
- Review the returned spans. The panel reports a transcript identifier and a count such as
Transcript ready with N spans.
Transcription consumes the normalized 48 kHz stereo PCM for the selected asset. It is local to the desktop runtime; it does not send video or audio to the configured AI provider. Timing is projected into project frames and may be marked approx. when the native transcript span is approximate. Treat generated text and timing as evidence to review, not as a guaranteed verbatim or legally authoritative record.
The transcript is stored as an app-managed transcript artifact outside project.json, while the project document can refer to it through caption items. The artifact is tied to the source content identity and source frame range. Replacing/relinking a source changes the identity and requires fresh evidence.
9.4 Search a transcript
Enter a phrase in Find a phrase and press Enter or click the search arrow. Results show source frame ranges and text; an approx. marker identifies approximate timing. Click a result to seek to the matching placed clip. The source must be selected in Audio/video source, and a placed clip must contain the source range. If no matching clip is placed, the panel reports that no placed clip contains the range rather than seeking to an unrelated location.
To search a hit belonging to another asset, switch Audio/video source first. Switching sources clears the current transcript ID and hits to prevent mixing evidence across files.
9.5 Apply captions
- Select the transcript source in Audio/video source.
- Select a video or audio clip in the timeline whose
assetIdis that same source. - Ensure the transcript identifier shown in the panel belongs to the current source.
- Click Apply captions.
- Review the caption blocks on the text track and the rendered preview.
Cutterhoochee applies the transcript spans as new editable caption items with the boxed caption style. The operation first removes all existing captions owned by the selected clip, including manual wording, style, placement, and layout edits, then recreates captions from the transcript spans that overlap the clip source range. The operation requires a selected clip from the current source; it will not apply a transcript to an unrelated clip. Captions are placed according to source intervals projected through the clip’s Source in and timeline position.
Applying captions is an edit and is undoable, but it can create many text items. Save before applying if you need an easy rollback point. Edit wording, style, placement, or other visible properties in Inspector after selecting a caption block. Those edits change the caption item only; they do not edit the underlying transcript evidence.
9.6 Import an SRT instead
Click Import SRT. The native file chooser requests an SRT file and imports its cues as editable caption items at the current playhead. SRT import does not require the Whisper model or a provider connection. The imported cues are not automatically a transcript identifier, so Apply captions is not the path for SRT cues; review and edit the caption items directly on the text track.
The current UI has no text/caption timing drag control. If SRT cues are imported at the wrong playhead, use Undo, seek to the intended playhead, and import the SRT again. The SRT parser validates cue order and frame conversion against the project profile. If cues overlap, are malformed, outside the usable range, or use unsupported timing, correct the SRT externally and import a clean copy. Do not assume every subtitle dialect or styling extension is preserved.
SRT input must be one UTF-8 file, no larger than 5 MiB, with nonempty cues and increasing, non-overlapping positive time intervals. Cue starts are rounded down and ends up to project frames; a very short positive cue can become one frame. A minimal example, saved as a plain UTF-8 .srt file, is:
1
00:00:00,000 --> 00:00:02,000
Welcome to Cutterhoochee.

2
00:00:02,000 --> 00:00:04,000
Let us begin.
Set Preview playhead to frame 0 before importing this example if its first caption should start at the beginning of the timeline.
10. Pi assistant, providers, and permissions
10.1 What Pi can and cannot do
The right pane is an optional Pi assistant session. The assistant can request editor operations, inspect project-local evidence, and use permission-gated external tools when the provider/runtime supports the requested operation. Ordinary manual editing remains available when Pi or its provider is unavailable.
Pi does not make an external provider trustworthy by itself. A prompt is an instruction to an agent; it is not a commit preview or a substitute for reviewing the resulting revision. Inspect the timeline, preview, notices, and history after every assistant edit.
The app’s prompt examples are:
Remove the first two secondsAdd captionsMake this vertical
More precise prompts are safer and easier to verify. For example:
On Main Video, remove the range from frame 0 through frame 60, ripple later clips, and do not touch Main Audio.Find the phrase “setup explanation” in the selected source and report the matching frame range; do not edit.Add captions from the transcript for the selected red.mp4 clip, then stop so I can review them.Set the selected clip to Contain, keep its audio disabled, and do not add a transition.
If you want an operation without AI, use the manual controls described in Sections 5–9. Do not ask Pi to invent a file path, provider model, codec, or shortcut that is not visible in the current build.
10.2 Start, stop, and restart a session
- Open Provider settings and connect/select a provider and model (see below).
- Return to Assistant chat.
- Type into Describe an edit….
- Press Enter to send, or Shift+Enter for a multi-line prompt.
- Watch assistant text and tool cards. Expand a tool card to inspect its details.
- If the run is unsafe, too broad, or simply no longer wanted, click Stop.
- If the conversation has become confusing, click New assistant session. This clears the assistant history for the current project scope; it does not undo committed editor changes.
The chat shows assistant text and tool updates. Activity → Native work shows native operations, affected targets, confirmed project changes, approval waits, and background jobs. Nonterminal work and failed receipts stay visible by default; completed and cancelled entries are behind Show history (N), which expands the activity history. A returned job ID means work started, not that it completed. Cancel requests cancellation; the final state and any error come from the native job. Stop does not undo edits already committed.
Activity highlights are separate from your selection. Reads briefly identify inspected targets; confirmed edits can show the affected range, an old clip position, or Inspector before/after values. Dry runs do not animate committed changes. Large changes use bounded highlights rather than animating every item. Show explicitly reveals a target outside the current view without selecting it or starting playback. Activity alone does not take your focus, scroll position, or playhead; reduced-motion preferences are respected.
Explicit assistant play, pause, and seek requests use the visible player and wait for its acknowledgement. Inspection and other read-only tools do not restart playback. A confirmed time-range selection stays visible until another selection replaces it. Review the actual revision and native activity result before retrying a failed operation; a later cancellation does not mean an earlier commit was rolled back.
10.3 Provider settings
Click the key icon in the chat intent or Provider settings in the top bar. The dialog contains:
- Connections list and Refresh providers.
- Provider connection state such as Not connected, auth type, and model count.
- Authentication selector with API key or OAuth sign-in where supported.
- API key input, shown only for API-key providers.
- Session-only credential checkbox.
- Connect, Refresh connection, or Disconnect.
- The Model selector, populated only with models reported by the connected provider.
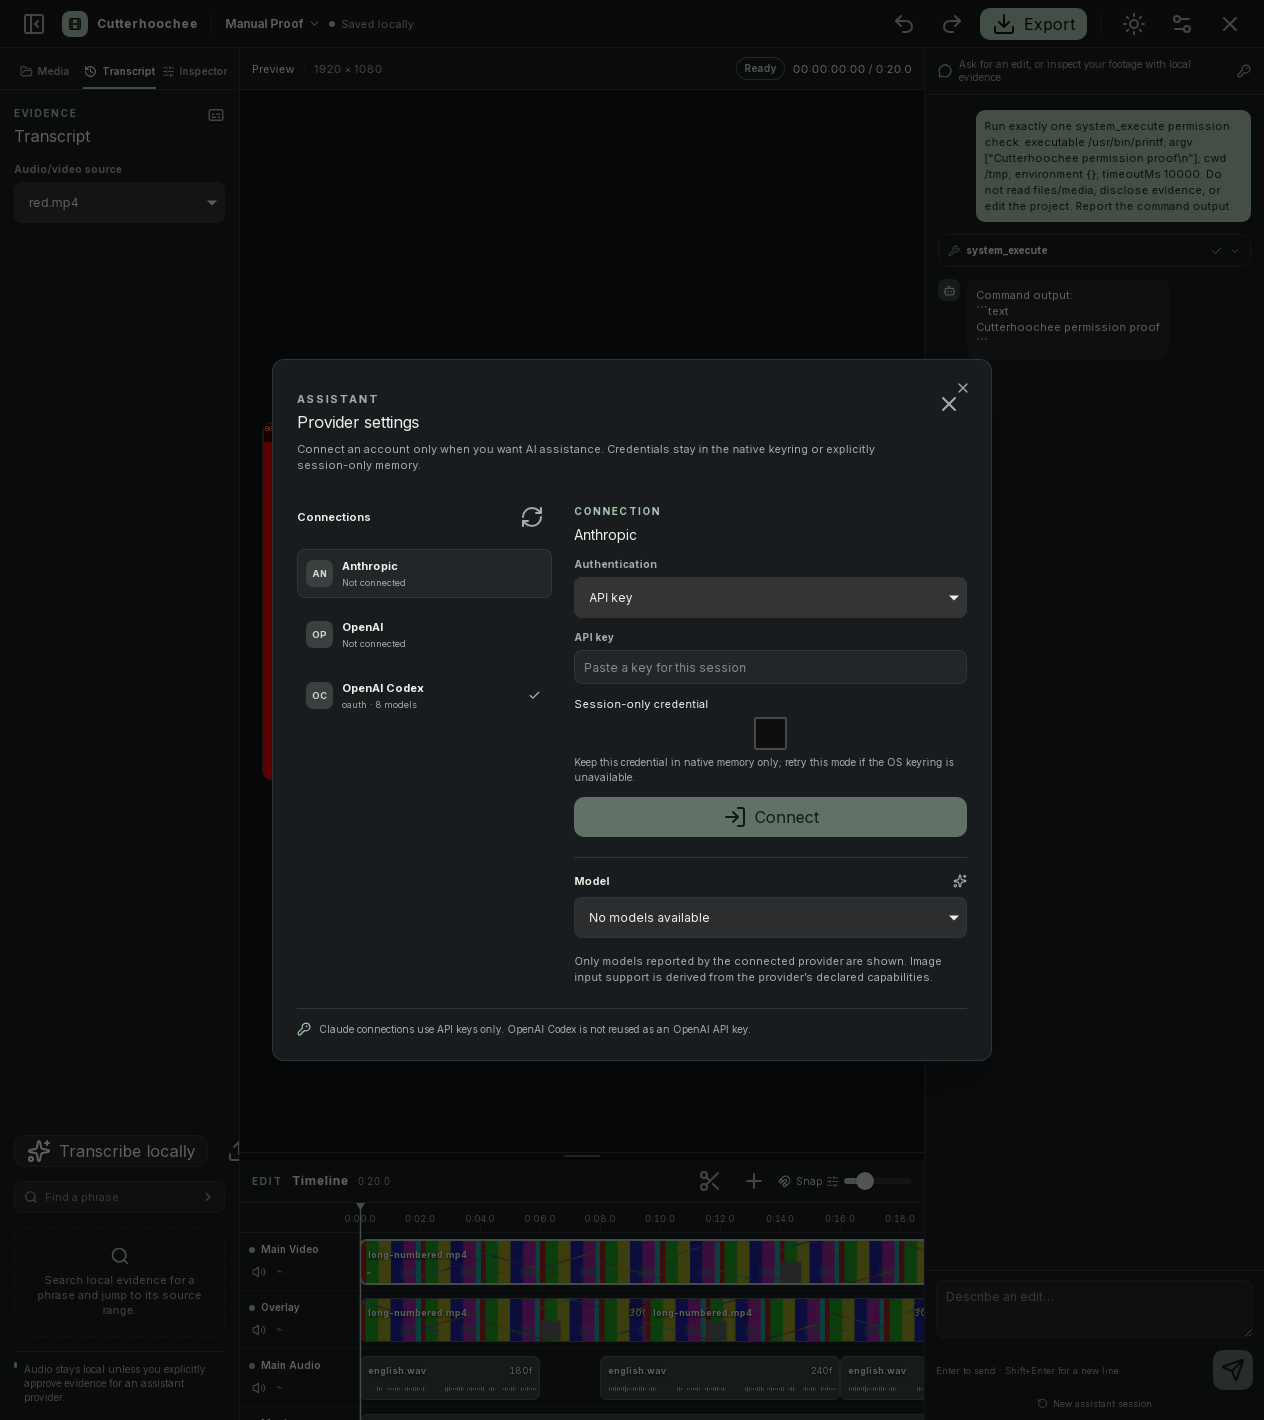
Figure 11 — Provider settings capture. The API key field is blank and shows the placeholder Paste a key for this session; no credential or account PII is visible. It shows a connected OpenAI Codex subscription entry and unconnected API-key providers in that particular demonstration state.
Only a connected provider’s declared models appear. A model marked with image evidence is one the provider declared capable of image input; do not infer native video input from that label. If a model does not appear, click Refresh providers and Refresh connection, then confirm the provider’s authentication state.
10.4 Credentials
Credentials are user-entered and must not be copied into prompts, screenshots, issue reports, or project files.
| Provider | Supported connection |
|---|---|
| Anthropic | API key |
| OpenAI | API key |
| OpenAI Codex | Its separate OAuth/PKCE subscription flow |
The underlying SDK may know other providers, but this app does not expose them as supported connections. Selecting an unsupported authentication combination does not make it available.
- For an API-key provider, select API key, paste the key into API key, and click Connect.
- For OAuth, select OAuth sign-in where the provider exposes it, follow the native prompt, and complete the provider’s HTTPS flow. Authorization codes do not enter chat.
- For OpenAI Codex, the UI uses its separate OAuth/PKCE subscription flow. It is not an OpenAI API-key alias; do not paste an OpenAI API key into the Codex connection.
- If the operating-system keyring/credential store is unavailable, enable Session-only credential and retry. In that mode the credential remains in native memory only for the session and is not persisted by the app.
- Click Disconnect to remove the configured connection from the provider runtime. Verify the provider status after disconnecting.
The exact provider availability and model catalog are runtime/provider facts. This guide does not promise that a named cloud provider, model, region, quota, or image capability will be available in every installation.
10.5 Evidence consent
Every assistant prompt—including a project-status question or edit-only instruction—requires the project evidence grant before the prompt is run. If the grant is missing, Cutterhoochee shows Share project evidence? with:
- Provider and account identity.
- Project/workspace scope.
- A description that sampled frames and transcript spans may be sent.
- Deny.
- Allow evidence.
Review the provider/account and project scope before allowing. Deny keeps the evidence local. Allow evidence creates/uses a broader grant for managed frame and transcript evidence in the displayed workspace/project/provider/account context; it is not limited to one asset, one range, or one prompt, and subsequent in-scope evidence may not ask again. It is not blanket permission to upload every project file or original, but you should treat it as permission for future managed-evidence requests in that scoped context. Do not allow evidence for a provider you did not intend to use.
The grant is persisted in app-owned permission storage; the dialog does not show or approve a complete list of individual assets/time ranges. There is no dedicated evidence-revoke switch in the current UI. Use Close project within the running app to retire the active project context and revoke its grants; reopening then requires approval again. Do not rely on restarting the app to revoke consent, because matching persisted permission state can be loaded again. Stop cancels a run but is not a consent-revoke command. Once authorized, your typed chat messages are sent to the connected provider too.
Evidence consent is distinct from the local speech-model download consent and from file/system-operation approvals. You may approve one and deny another.
10.6 Native permission requests
When an assistant or external operation needs authority, the UI shows Permission required. Review the exact details before choosing Allow once or Deny:
- Operation (for example, system execution or an external operation).
- Executable, exact Arguments, and Working directory for a command.
- Paths or Target identity for file access.
- Destination, HTTP method/URL, body size/hash, or read range when relevant.
- Timeout and whether it will Overwrite existing target.
- The project/generation and Assistant run scope.
The dialog warns that the working directory is not a sandbox and that completed effects are not reversed by Timeline Undo. Deny cancels that request. Allow once authorizes the exact native operation shown, not an unbounded future command. Never approve an unfamiliar executable, a path outside your intended work area, a destructive overwrite, or a network destination you have not verified.
File grants, external evidence grants, system reads/writes/executes, HTTP calls, and export destinations are enforced by the native runtime and scoped to the current app workspace/project generation. If the project changes while a prompt is pending, the request may be rejected as stale; send a new prompt only after reviewing the new scope.
11. Export
11.1 Capture a deliberate revision
Before exporting:
- Save the project with Ctrl/Cmd+S.
- Review the current revision number in the top bar/status and inspect the complete timeline and preview.
- Confirm that all assets are normalized and no card says Media preparation is incomplete.
- Check captions, actual audio output, clip gain/fades, track mute state, and transition overlaps. Mute silences that track's audio in preview and export (video remains visible when its track is muted), and Clip audio controls audio on both video-track and audio-track clips.
- Click Export or press
Ctrl/Cmd+E.
The Export video dialog captures the selected current revision. Its message explicitly says the export will not change if you continue editing. Edits made after export starts do not mutate the captured render plan; they become a later project revision.
11.2 Choose resolution and sidecar
The dialog offers:
- Resolution:
720por1080p. - SRT caption sidecar checkbox.
- Export action inside the Export video dialog.
The width/height follows the project aspect. For a landscape project, 720p/1080p produce 16:9 dimensions; for portrait they produce 9:16; for square they remain square. The dialog displays the resulting dimensions and H.264 / AAC at the project frame rate. The native export surface is bounded to these 720/1080 choices; it does not accept arbitrary output dimensions.
If SRT caption sidecar is selected, Cutterhoochee writes an .srt beside the MP4 using the same base filename; no second file chooser is used. It requires its own write/overwrite permission. The sidecar contains projected timeline captions, not ordinary title items; it is additional to captions already rendered into the video pixels.
11.3 Choose a safe destination
Click Export inside the Export video dialog and choose a destination in the native save dialog. It must be a real local directory and an .mp4 path. If you omit the extension, Cutterhoochee adds .mp4; another extension is rejected. Every export requires a Permission required approval for the MP4, including a new file. Review the exact destination and choose Allow once only if writing it is intended. If SRT is enabled, a second separate approval is required for that file. Existing MP4 and SRT files each require their own overwrite approval; verify both targets before allowing replacement.
The exporter writes temporary files, renders every frame through the captured canonical renderer, encodes with FFmpeg, probes the result, verifies H.264 video, AAC audio, 48 kHz stereo audio, dimensions, frame rate, and duration, then atomically finalizes the destination. A failed/cancelled export should not be treated as a valid deliverable.
11.4 Monitor, cancel, and inspect the result
After start, the dialog shows a job state such as Waiting for export worker… or Rendering immutable revision…, progress, and a job ID. The states are:
queuedrunningcompletedfailedcancelled
Click Cancel/the stop control while the job is running if you need to stop it. A cancelled job is not a finalized export. Do not open a partially written temporary file from the destination directory.
After successful completion, the dialog shows Export complete and enables:
- Play — opens the finalized MP4 in the approved native opener.
- Show file — reveals the finalized MP4 in the file manager.
- Exported is the disabled completed-action label, not a close button. Use the Close export dialog icon to dismiss the dialog.
The native runtime rechecks the finalized file identity before Play or Show file. If the destination was replaced after completion, those actions fail rather than opening a different file. If you manually replace the file, export again to a new destination or start a fresh export.
12. Keyboard shortcuts
These shortcuts are implemented by the current UI. Global workspace bindings apply outside input, textarea, select, and content-editable controls; the focused-control bindings near the end of the table have their own contexts. The exercised desktop platform is Linux; Cmd describes implemented macOS key handling, not a verified macOS package.
| Shortcut | Action | Conditions and notes |
|---|---|---|
Space |
Toggle Preview play/pause | Works when the focus is outside an editing field. |
Left Arrow |
Move playhead one frame backward | Clamped at frame 0. |
Right Arrow |
Move playhead one frame forward | Moves by one project frame. |
S |
Split selected clip at playhead | No modifier; a clip must be selected and the playhead must be strictly inside it; a dissolve must be removed first. |
Delete |
Remove selected clips | If Shift is also held and a non-empty ruler range is selected, the range action takes precedence; otherwise this falls through to selected-clip deletion. |
Shift+Delete |
Remove selected range with ripple | Requires a non-empty ruler range for range removal. With no valid range, it falls through to deleting selected clips, so verify the highlighted range before pressing it. This is destructive to later timing but undoable. |
Ctrl/Cmd+Z |
Undo | Project history, revision-checked. |
Ctrl/Cmd+Shift+Z |
Redo | Project history, revision-checked. |
Ctrl/Cmd+I |
Import | Opens the native media chooser. |
Ctrl/Cmd+S |
Save project | Synchronizes the current project file and directory; edits are already atomically persisted. No Save As chooser. |
Ctrl/Cmd+E |
Open Export video | Opens export; it does not silently begin rendering until destination/permissions are handled. |
Enter |
Send assistant prompt | In Describe an edit…; use Shift+Enter for a new line. |
Shift+Enter |
New line in assistant prompt | Does not send the prompt. |
Enter or Space |
Select a focused media card | When the media card itself has focus, not a child control. |
Enter |
Search transcript | When focus is in Find a phrase. |
Arrow Up/Arrow Down |
Resize timeline | When the focus is on the Resize timeline separator. |
Arrow Left/Arrow Right |
Resize Assistant | When the focus is on the Resize assistant separator. |
Ctrl is used on Linux/Windows-style keyboards and Cmd on macOS. In the workspace, the top bar exposes Import, Save project in the project-title menu, and Export as explicit actions alongside these shortcuts.
Backspace is not a timeline-delete shortcut, and Ctrl/Cmd+Y is not the implemented redo shortcut.
13. Practical end-to-end tutorial
This workflow intentionally uses only controls that are visible and implemented. It works with generated test media or your own local files.
13.1 Create a portrait captioned cut
- Launch the Linux x64 AppImage and confirm Desktop ready.
- On the start screen, click Start a new project.
- On Choose a visual format, select Vertical video — 9:16, 1080 × 1920 — for Shorts · Reels · TikTok.
- Click Continue to details.
- On Name and review your project, enter
Portrait demoas Project name. - Leave Advanced settings closed and confirm the Frame rate summary is 30 fps.
- Click Create project, choose the parent folder in the native dialog, and note the resulting
Portrait demo.cutprojpath. - Open Media and click Import media (or use the top-bar Import button).
- Select one video with an audio stream and, optionally, a separate WAV file or still PNG/JPEG/WebP.
- Wait until the imported card has a thumbnail/duration and no Preparing normalized media… warning.
- Select the video card and click Add to timeline; this appends it to the end of the first video track, not at the playhead. Select an audio card and add it to Main Audio if you need a separate music/voice layer; the default audio insertion starts at frame 0 and is capped to the existing timeline duration.
- Click the video clip in Timeline. In Inspector, confirm Timing and set Fit to Contain if you want the complete frame visible. Click Apply timing only after checking the whole-frame values.
- Play the project. If the preview remains unavailable, toggle the quality button from auto to software, then click Retry preview if shown.
- Drag the timeline ruler over an unwanted opening section. Confirm the start/end frames in the range highlight before pressing
Shift+Delete; with no valid range, that shortcut deletes selected clips instead. Immediately use Undo if the ripple result affects a track you meant to preserve. - Put the playhead on a clean boundary, select the clip, and press
Sto split. Do not split inside a dissolve; this example has none. - Select the Transcript tab and choose the video under Audio/video source.
- Click Transcribe locally. On first use, review Download local speech model?. If you accept the one-time download, click Download and transcribe; otherwise click Not now and continue with manual text or Import SRT.
- Search for a phrase using Find a phrase. Click a result to seek to its source range and verify the words against the audio.
- Select the matching video clip in the timeline and click Apply captions. Review each
CCblock in Timeline. Reapplying later will replace all captions owned by this clip, so finish any transcript-derived caption edits after the last application. - Return to Media or use Add title at the current playhead. Select the title block, edit Text, and adjust Style, size, and positions in Inspector.
- Select the first clip, identify the next clip, and use Transitions → Frames → Dissolve next to add a short dissolve only if both clips are long enough. Preview the overlap.
- Use Gain · dB, Fade in, and Fade out to balance audio. Clip audio can exclude audio from the selected video- or audio-track clip. Mute silences a track's audio in preview/export; muting a video track leaves its video visible.
- Save with
Ctrl/Cmd+Sor Save project. Wait for Saved locally. - Click Export. Choose
1080pfor a full-size portrait deliverable, check SRT caption sidecar if a separate subtitle file is wanted, and start the export. - Choose the MP4 destination. Review and answer its mandatory Allow once request and the separate SRT request if enabled; inspect existing-file overwrite details for each.
- Wait for Export complete and 100% progress. Use Play to watch the finalized MP4, and Show file to reveal it. Keep the MP4 and
.srttogether if you selected the sidecar.
13.2 Optional Pi-assisted variation
At step 10 or later, connect a provider in Provider settings, select a model reported by that provider, and return to Assistant chat. Instead of making a broad request, send one auditable operation at a time:
Find the phrase “setup explanation” in the selected audio/video source.
Do not edit the project. Return the matching source frame range and tell me if timing is approximate.
Review the result. Then, if you want an edit:
On the selected video clip only, remove the first 30 project frames with ripple enabled.
Do not change Main Audio or captions. Stop after the edit so I can review the new revision.
Before the first prompt in an unapproved context—including either example above—inspect Share project evidence? and deliberately choose Deny or Allow evidence. This is broader project-context consent, not permission for only the phrase or clip named in the prompt. For a native command, inspect Permission required separately. A prompt that says “make this vertical” cannot change the project profile through an unsupported hidden control; create a new portrait project and re-import/assemble there if you need a different aspect.
14. Troubleshooting
“Browser preview · desktop required”
You are not connected to the native desktop bridge. Launch the Linux x64 AppImage itself. Browser mode is not sufficient for native project dialogs, media imports, normalization, transcript model download, export, or permission prompts.
The start screen does not create a project
- If you cancelled the parent-folder chooser, return to the details step and try again; the selected format, name, and frame rate remain in the wizard.
- Use a writable, real local directory.
- Do not choose a directory that already contains a project if you intended Start a new project; the store refuses to overwrite an existing project at that location.
- Check that the name is not only whitespace.
- Choose one of the three format cards and one of the supported frame rates.
“The project is busy” or another instance is open
A project directory is locked by its active writer. Close the other Cutterhoochee window/process and retry Open project. Do not delete .project.lock while another process may still be writing.
A media card stays in preparation
- Wait for the media job to finish; video normalization creates master/proxy artifacts and can take longer than thumbnail generation.
- Check the card’s warning text: Preparing normalized media…, Media preparation is incomplete., and Thumbnail unavailable. identify different stages.
- Confirm the source is a standalone local file from a supported family, not a playlist/network source.
- Confirm the source is a standalone local file from a supported family, not a playlist/network source.
- Confirm the source or required managed artifact still exists and has not changed while import runs.
- If native preparation reports missing/incomplete normalized media, use Relink and select the intended source; an absent original path alone does not require relinking when the managed masters/PCM are intact.
- If the file has no decodable video/audio stream, or has an unsupported demuxer, re-encode it to a conventional local MP4/WAV/PNG/JPEG/WebP file before importing.
A source imports but has no usable audio
Only assets with normalized audio appear in the Transcript source selector. Confirm the source actually contains an audio stream and that preparation completed. A video-only file can still be edited/exported; it simply cannot be transcribed until you import a source with audio.
“No normalized audio source”
Import a video or audio asset with an audio stream, wait for normalization, then reopen/refresh Transcript. Selecting an image or a video-only asset cannot create a transcript.
The preview is blank, slow, or shows buffering
- Confirm the asset card is ready and the source thumbnail/waveform is not still preparing.
- Click Retry preview if the error overlay offers it.
- Toggle the quality control from auto to software.
- Seek to a nearby frame using Previous frame, Next frame, or Preview playhead.
- Check that the project has at least one clip and that the clip’s source range is valid.
- If only one source fails, relink/re-import a conventional local copy and inspect the native error notice.
Software preview is a diagnostic/preview fallback, not a promise of hardware acceleration or full-resolution playback.
Preview plays video but no sound is audible
Check the selected clip’s Clip audio, Gain · dB, fades, the containing track’s Mute state, and the playhead interval. Clip audio applies to both video-track and audio-track clips. Mute/Unmute silences or restores a track’s audio in preview and export; muting a video track leaves its video visible. A waveform may be unavailable even when audio is valid, so inspect the notice and listen to the preview and final output. If the source has no audio stream, use a separate normalized audio clip.
Split says the playhead is outside the clip
Move the playhead strictly between the clip’s first and last frame. The first and last boundaries are not valid split positions. If an explicit dissolve touches the clip, use Remove dissolve, split, and add a new valid transition afterward.
Range removal changed more tracks than intended
Shift+Delete invokes ripple range removal. It can shorten/split clips and shift later clips/text. Immediately use Undo, then lock tracks you intend to protect and repeat with a narrower ruler range. Do not assume locked tracks can always be ripple-edited; the native editor may reject a change that would touch a locked caption/text track.
Inspector says values are invalid
Timing values must be non-negative whole frames and duration must be positive. Canvas positions are base points from 0 to 10000; gain accepts the range exposed by the control. Leave a field to commit on blur, then refresh. If the clip is involved in a dissolve, remove/rebuild the transition around the new timing.
“Add a text track before creating a title”
The current project has no text track. Add or restore a text track through the supported editor operation/build before clicking Add title. Do not expect the plus button to create a missing track automatically.
Transcription asks for model consent every time
The model status is checked in app-owned storage. Review the displayed File, Revision, and SHA-256. If the model is not present or fails verification, a fresh Download and transcribe consent is expected. Decline with Not now if you do not want a network download; use Import SRT or manual text instead.
Transcription returns no spans or approximate timing
The native transcription parser may return no speech spans for silent/unsupported audio. Approximate spans are marked approx.. Review the audio and edit text/timing manually. Do not apply an empty/no-span result as if it were a transcript.
Apply captions is disabled or rejected
Select a transcript source, a transcript produced/imported for that source, and a placed clip whose asset is the same source. Applying captions replaces all existing captions owned by that clip, including manual text/style/layout edits; apply only after you are ready to regenerate that clip’s owned captions. A transcript hit from another asset cannot be applied to the current clip. If the clip does not cover the transcript’s source range, extend/choose the correct clip or import the relevant source range.
Provider shows “Not connected” or no models
- Select the intended provider in Connections.
- Choose the provider-supported Authentication method.
- For API keys, enter the key in API key; never in chat.
- If the keyring is unavailable, enable Session-only credential and retry.
- Complete any native auth prompt, then click Refresh providers.
- Select a model from the reported Model list; the app does not invent models.
For OpenAI Codex, use its own OAuth/PKCE sign-in. Do not reuse an OpenAI API key as Codex credentials.
A provider request asks for evidence
Every assistant prompt needs the project evidence grant before running. Read the provider/account and project scope in Share project evidence?. Choose Deny to withhold it, or Allow evidence only if future managed frames, thumbnails, and transcript spans from that context may be shared. It is not a one-asset or one-range approval. See Section 10 for its persistence and the Close project revocation procedure.
A permission prompt shows an unexpected command/path
Choose Deny. Review the exact executable, arguments, working directory, paths, URL, destination, overwrite flag, and scope. Ask Pi again with a narrower prompt only after confirming the current project and provider. A completed external effect is not reversed by timeline Undo.
Save reports an unknown outcome
Stop editing that project, follow the notice to reopen it, and inspect the reopened revision. Do not assume whether the last write won or failed, and do not copy/replace project.json while the old writer remains open.
Export fails, is cancelled, or cannot open the output
- Verify the project is non-empty and all referenced artifacts are available.
- Confirm the destination is a real local directory and the filename is
.mp4. - Review the exact overwrite permission request for both MP4 and optional SRT.
- Wait for
completed/Export complete before using Play or Show file. - If the destination was replaced after completion, export again to a new path; the identity check intentionally refuses to open a different file at the same path.
- A cancelled or failed job is not a valid deliverable, even if a temporary file is visible.
The project opens but media is missing on another machine
A complete .cutproj copy with intact managed masters, PCM, and other referenced artifacts remains editable, playable, and exportable even if original paths differ. Do not relink merely because an original moved. If required normalized media is actually missing and Relink is offered, select the matching source and wait for preparation. Preserve original media separately if you may need regeneration later. Windows/macOS portability is not verified by this guide.
15. Privacy, storage, and portability
15.1 What is stored where
A .cutproj directory contains the portable project document (project.json) and app-managed media/artifact directories. The artifact store uses finite, app-owned directories for normalized masters, proxies, PCM, still images, thumbnails, waveforms, frames, and transcripts. The project document records IDs, content identities, profile/timeline entities, and references; it is not a loose arbitrary-path cache.
Local transcript files are managed artifacts outside project.json. They are tied to source content identity and frame ranges so that an evidence result from one source is not silently used for another.
The installation also has app-owned storage for provider/keyring integration and the downloaded speech model. Permission grants and provider evidence authority are installation/workspace-scoped and do not become portable project permissions merely because the project directory is copied.
15.2 Originals and derived media
Importing reads the original through a native file grant and writes normalized masters/proxies/PCM to app-managed storage. The original file is never deleted by library Remove. A complete .cutproj copy that retains its managed masters/PCM and other referenced artifacts remains editable, playable, and exportable even if the original path later moves or its original grant is unavailable. If you need to archive a project, preserve:
- The complete
.cutprojdirectory, includingproject.jsonand managed artifacts. - Original source files as an additional archive when you may need to regenerate missing artifacts or relink an incomplete asset.
Relink is a recovery path for missing/incomplete normalized media, not a required step merely because an original path is absent. Do not delete the media subdirectories while a project is open.
15.3 Network boundaries
- The editor’s default workflow is local and the start screen says Offline by default · no telemetry.
- The first-use speech-model download is an explicit network action shown in Download local speech model?. It is downloaded to app-owned storage; the media remains local.
- Provider login and assistant prompts can contact the configured provider after you connect it.
- All assistant prompts require the separate Share project evidence? grant before running. That approval covers managed frame/thumbnail/transcript evidence in the workspace/project/provider/account context, not only one asset, one range, or one prompt. Later in-scope evidence may not prompt again.
- Permission dialogs identify external HTTP, file, and system operations. Approve only the exact request you understand.
This guide does not claim that a provider’s own retention, billing, regional processing, or account policies are the same as Cutterhoochee’s local storage behavior. Review the provider’s policy before connecting an account or allowing evidence.
15.4 Backups and copying
To make a project backup:
- Save with
Ctrl/Cmd+S. - Wait for the local save status to settle.
- Close the project.
- Copy the complete
.cutprojdirectory to a backup volume. - Preserve original media if you may need to regenerate missing artifacts or recover an incomplete import.
Do not copy only project.json, only the media folder, or only the AppImage and assume the edit is portable. Do not copy credentials or app-data directories into a project backup.
16. Limitations and glossary
16.1 Current limitations
- This guide verifies the Linux x64 AppImage workflow. Windows and macOS are unverified.
- Browser preview is not a native desktop runtime; native file access, normalization, provider auth, permissions, and export require the desktop bridge.
- Project aspects are limited to the Vertical video 9:16 (1080 × 1920), Landscape 16:9 (1920 × 1080), and Square 1:1 (1080 × 1080) cards.
- Project frame rates are limited to 24, 25, 30, and 60 fps; 30 fps is the default and the other choices are under Advanced settings. Timeline timing is integer frame-based.
- Native export offers 720p and 1080p choices and produces H.264 video with AAC, 48 kHz stereo audio after validation. Arbitrary dimensions/codecs are not exposed by the current export surface.
- Import rejects playlists and network media (including HLS/DASH/concat/segment/HTTP/RTSP paths) and requires an allowed standalone demuxer/decodable stream.
- Transcription requires normalized 48 kHz stereo audio and the native-pinned multilingual model, or an imported SRT for the manual-caption route. Generated wording/timing requires review.
- The local model download and assistant evidence sharing are separate consents. Neither is implied by opening a project.
- Provider/model availability is dynamic. Only connected providers and their reported models/capabilities appear.
- Pi can request editor and external operations, but AI output is not a substitute for revision review. External effects approved through permissions are not reversed by timeline Undo.
- Preview Software mode is a bounded fallback for display; it is not an export-quality guarantee.
- The current UI exposes same-track clip movement and insertion; do not assume arbitrary cross-track drag-and-drop, arbitrary track creation, or hidden project-profile conversion controls.
- Track Mute silences that track’s audio in preview and export; muting a video track leaves its video visible. Clip audio disables audio on both video-track and audio-track clips.
16.2 Glossary
AppImage — A self-contained Linux application package used by the exercised Cutterhoochee build.
Asset — A project library entry representing an imported original plus its recorded identity and normalized artifacts.
Artifact — An app-managed derived file such as a master, proxy, PCM audio file, thumbnail, waveform, frame, or transcript.
Base point (bp) — Cutterhoochee’s normalized coordinate unit. Canvas positions and scale/opacity use bounded base-point values rather than CSS pixels.
Caption — An editable CC text item, usually generated from transcript spans or imported SRT cues and rendered into the project.
Clip — A placed use of an asset on a track. It has project Start, source Source in, Duration, and audio/visual properties.
Content identity — The recorded identity/content hash and filesystem metadata used to detect a changed, moved, or replaced original.
Dissolve — An explicit video transition whose two clips overlap by an exact number of frames.
Evidence — Sampled frames and/or transcript spans requested for assistant inspection. Evidence sharing requires explicit provider/account consent.
Frame — The integer timing coordinate used by the project timeline. It is converted to timecode using the project frame rate.
Generation — The native session/project scope token used to reject stale operations after a project is closed or changed.
Master — The normalized project-profile video artifact used for canonical preview/export rendering.
Normalized audio — App-owned 48 kHz stereo PCM derived from an imported audio stream.
Pi — The optional assistant runtime/harness behind Assistant chat. Pi may request edits, evidence, or permission-gated external operations.
Proxy — A lower-resolution, same-frame-count normalized video artifact used to make preview work more practical.
Project revision — The monotonically advancing document state captured by edits/saves. Export pins the revision it captures.
Render plan — The native, immutable composition/timing/audio description used by preview and export for one project revision.
Ripple range removal — Shift+Delete on a selected ruler range. It removes the range and shifts later timeline content while projecting affected clips/text/captions.
SRT — SubRip Subtitle text format. Cutterhoochee can import SRT cues as editable captions and can optionally export a sidecar beside the MP4.
Source in — The first source frame used by a clip. Changing it changes which normalized source frames appear without necessarily changing the clip’s timeline start.
Track — A timeline row containing video, audio, or text items. Tracks have lock and mute controls; Mute controls whether that track contributes audio to preview/export, while video remains visible when a video track is muted.
Workspace — The app-owned authority scope that binds a project, managed artifacts, credentials/permissions, and native runtime state. Workspace authority is not copied into the portable project JSON.